Sunday, August 31, 2014

Two quick tutes

It's nearing the first of the month, which means I'm swamped with looming deadlines and sitting on a pile of projects I can't reveal just yet. What I can show you are a couple of tutorials you might find helpful.

First, I've put together this snapguide showing how I assemble the flower die-cut accessories from Graphic 45 for pretty dimensional flowers.


And secondly, a guide on how to achieve a crackle paint finish... without crackle paint finish. I'm certain many of you have seen this technique, it certainly isn't my original invention, but for those who haven't it's a nice little trick to file away for future use.


Hope you're enjoying the long weekend! 

xoxo

Friday, August 29, 2014

Back to School Magnets with Petaloo

My kiddo is going back to school which means that once again my fridge will become the household bulleten board. It's where every bit of work with a good grade will be displayed. It's also where important scraps of paper will be lost admid the jumble.

Magnet5

So I've decided that if my fridge will become a jumble (there's no two ways about it...) that it's going to be a pretty jumble!

Magnet4

I've created a set of pretty magnets using Petaloo flowers, Graphic 45 tags and stickers from their Couture collection.

Magnet1

I've glued two strong 'button' magnets on the back of each piece so that there's no sliding about.

Magnet3

It's a simple project but it sure will be nice for we mom's to have something elegant to look at while sorting through permission forms and fundraising sheets :)

Supplies:
Petaloo Burlap Blossoms
Petaloo Mixed Textured Layers
Couture Flowers
Couture Alphabet Stickers
Couture BannersMagnets

Thursday, August 28, 2014

The French Farm Box


I completed this piece a few weeks ago but it refused to be photographed. Another try with the camera this morning and I'm much more pleased with the results.


Miniature books, tea cups, flowers and even some very small mail are housed inside. It's sort of my imagining of the perfect, neat, little French fairy farm house.


The overall size of this piece is 5.4" x 7.25" x 3". Room boxes and dioramas are such a great way to get your dollhouse fix without having to accommodate an entire doll house :)


This piece is listed in the etsy shop HERE.

Wednesday, August 27, 2014

The Fairy Box

After much to-do and dallying I've finally finished "The Fairy Box". 


The exterior finishing touches were evading me for quite a long time... but I think I finally coaxed them out.


 The piece measures approximately 7.5 x 6.5 x 5.5 overall.


The insides include stacks of tiny books on a thread spool, various pots of glittery pixie dust, a basket of wands, bottles and vials of very nice things, and a fru-fru fairy frock on a clothespin mannequin.  


One of my favourite things is the little table inside. Unfortunately you can't make it out because it refused to be photographed. You'll have to take my word when I tell you it's made from old clothes pegs with chess knights (or horsey guys) for legs.


The Fairy Box is listed on etsy HERE.


Here's a list of some of the supplies that went into making this piece:
Glass Vials and Bottles
Wood Knobs, Feet, Roofs
Antique 3D Gold Crowns
Star Tinsel*
Just Wings Collage Sheet
Little Potions Collage Sheet
Miniature Glass Domes*
Pewter Dollhouse Dishes

Sunday, August 24, 2014

A big fat update post

It's seems an age since I gave a general 'this is what I've been up to' update. If you're interested in what's been going on around here... read on!


I finished my two children's workshops at the local library. Kids are so much fun to watch as they explore and experiment. I felt very special indeed when one of my favourite little crafty kids gifted me two friendship beads. I don't give a hoot that I'm 40, I'm wearing these proudly!


After the great ice storm last winter (and I do mean 'great' as in large, not as in super-duper fun) panic sort of set in. We've had a woodburning stove installed so that we won't freeze to death should the power go out this year. So if you find yourself near by and without juice you can come visit us for heat and mulled wine :)


I've been working my next set of altered Altoid tins. This is the prototype for the exterior. It's Magic Screen from Pee-wee's Playhouse! This set is SLOWWWW going so it may be a while before you see the next update.


This snap is from another 'in progress' project. The inside is almost done but the exterior is being a pain. Sometimes I have to wait for just the thing to come along to finish off a piece... this is one of those times.


Believe it or not I'm actually starting on my Christmas making. It's seems impossible to me but here's photographic evidence of a holiday order in the making.


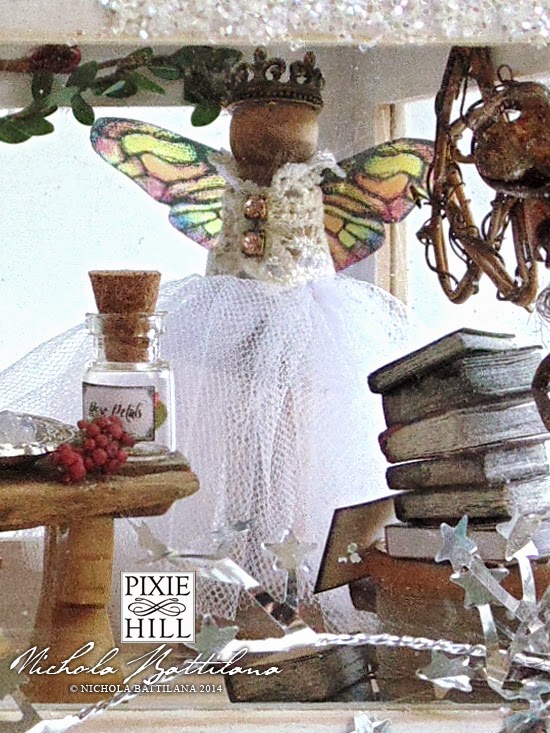
Finally, this wee silkworm pixie was discovered in the studio and is freshly listed in the etsy shop.

Friday, August 22, 2014

Fussy Cutting Tray with Graphic 45

I can not sit and watch tv without doing something with my hands. I drag my tools and supplies to the couch and inevitably lose them between the cushions and under pillows. Even worse, my fussy cut bits fall into that abyss! So I’ve upcycled an unwanted tray into a fussy cutting buddy. It’s a simple recon, but results in something useful and pretty. Totally optional (but really very handy) is the addition of a scrabble tile holder set off to the side. It’s a simple solution to prevent my tools from rolling around the work surface while avoiding the creation of any additional corners or crevices for little bits to get stuck in. 

I’ve used An Eerie Tale for my recon, but you can easily change up the Graphic 45 collection to suit your tastes. With coordinaing front and backs, picking two papers really gives you four paper options and makes mixing and matching pretty darned easy.

Graphic45_NBattilana_EerieTale_fussycuttray_1of copy


Graphic45_NBattilana_EerieTale_fussycuttray_1of copy


Want to make your own? HERE's a snapguide how-to!
 
Graphic45_NBattilana_EerieTale_fussycuttray_1of copy


Supply List:
An Eerie Tale  > Enchantment
An Eerie Tale  > Grand Illusion
Shabby Chic Ornate Metal Brads
Thrifted tray
Scrabble tile holder (optional)
Black acrylic paint
White tacky glue
Sandpaper
Black inkpad

Wednesday, August 20, 2014

Ring pillow with Tresors de Luxe

Today I'd like to share a rather small and oh-so-sweet ring pillow I created with a little fabric and lush Tresors de Luxe lace.


It was a simple thing to create. Two squares of fabric, a bit of stuffing and snippets of a variety of lace to embellish. 


I think it's awfully pretty and would make a lovely keepsake for the happily hitched couple.

But don't think for a moment that you need a wedding as an excuse to make something similar. Be inspired and create accent pillows for a shabby chic corner. Add small pocket in place of the ribbon and your tooth fairy would be very happy indeed!

Supplies:
Ivory Lace Trim LA-019
Ivory Lace Trim LA-115
Lace Trim GL-016
White Venice Lace LA-048
Fabric
Stuffing
Ribbon

Tuesday, August 19, 2014

Botanical Tea Guest Book

It used to be that weddings were ginormous events and huge tomes with pages and pages were necessary for all of the well wishes from wedding guests. Today however weddings are often smaller, more intimate affairs and perhaps a little handmade book would be more fitting. 


My cousin and his beautious bride got hitched in Vegas not long ago and I created this little book made with Graphic 45's Botanitcal Tea and Large Staples Tags to toss into their suitcase and collect congratulations from their guests.


It's a pretty little thing, a handmade something, to remind them of their gorgeous day.


Want to make your own special keepsake book? Here's the supply list:

Ribbon
Thread/Yarn
Paper

And here's how to put it all together...

Graphic45_NBattilana_BotanicalTea_Guestbook_a

Step One:  Cut several sheets of paper to 3.9” x 8”, the same size as the large tags. You could use regular bond (printer) paper or splurge and use better quality for something a little more special. Use a corner punch to round the edges of your paper so that they align perfectly with the tag edges.
Graphic45_NBattilana_BotanicalTea_Guestbook_b

Step Two: On ONE of the large tags, create a score line at 1.2” from the bottom, short edge.

Graphic45_NBattilana_BotanicalTea_Guestbook_c

Step Three: Cut four pieces of Graphic 45 paper to cover your tags. (I’ve chosen Spring Duet for the outside covers, and Fauna to line the inside.) At 1 ⅛” from the short bottom edge, cut a 1/4” strip from the papers that will embellish the front and back of the cover tag.

Affix your papers to the tags. Leave the fold line free on the front cover like so:


Graphic45_NBattilana_BotanicalTea_Guestbook_e

Step Four: Wrap a length of Washi Tape around the front cover where the exposed fold line is located and burnish into place.
Graphic45_NBattilana_BotanicalTea_Guestbook_g

Step Five: Puncture small holes in your covers and papers using a small punch, awl or nail. Mine are located .5” from the edge and there are 5 holes evenly spaced apart.
Graphic45_NBattilana_BotanicalTea_Guestbook_h

Step Six: Bind all of the pages together using thread, ribbon or yarn. If you look up Japanese Stab Binding, there are many tutorials available demonstrating this very simple binding technique in a variety of patterns.

Graphic45_NBattilana_BotanicalTea_Guestbook_i

All of these steps will help your book to lay flat when opened, avoid cracking paper, and provide stability to your fold line.

Graphic45_NBattilana_BotanicalTea_Guestbook_j

Step Seven: Now to embellish your cover! I begin with Botanical Tea Stickers...

Graphic45_NBattilana_BotanicalTea_Guestbook_k

… add some Botanical Tea Banners ...

Graphic45_NBattilana_BotanicalTea_Guestbook_l

… and a fussy cut butterfly.

Graphic45_NBattilana_BotanicalTea_Guestbook_m

Step Eight: Finally I add a Botanical Tea Chipboard tag, and Shabby Chic Ornate Metal Key with a length of pretty ribbon pulled through the tag grommet holes and finish the whole thing off with the lucky couple’s initials using Botanical Tea Alphabet Stickers.

Graphic45_NBattilana_BotanicalTea_Guestbook_5of7