Thursday, February 08, 2024

Tibetan Flowers, AI, and Clay Bells

These sweet little clay bells were inspired by a picture floating around social media of 'Tibetan Bell' flowers.


After seeing the image below someone said I should make teacups or bells that looked like them. Because I am an easily influenced person, and because it was an excellent idea, I totally did as was commanded.


But... are these REAL flowers? I suspect this image is actually AI generated. The only examples of this plant that I could find were from questionable seed sellers using this exact same image, and slew of AI sites. I could totally be wrong, but I'm leaning toward these being beautiful, but fake. Booo! The closest real flower is maybe a Fritillaria imperialis? While still beautiful, lacks the blue details. Searching 'orange and blue flowers' yields no relevant results. What do you think?  Whatever the case, we're living in weird, weird, times.


Whether these little bells were inspired by fake flowers, or the real deal, I like them well enough. I bet my fairy folk will be tickled with them too.

Thursday, February 01, 2024

Tiny Clay Cottages

I have been having far too much fin with my little mini microwave kiln. That thing has been put through the ringer over the past month! It's absolutely given me a kick in the creative pants. I'm completely and totally enamored.

My latest completed pieces are a slew of little clay houses.


Here they are freshly made. Once completely dry they're popped into the kiln for their first firing.


Here they are after their first firing and with glaze drying. They look dull and muted, but once they're fired again, the colours come to life and they have a glossy finish.


I mean, how cute are these finished fellas?! It's magic.


Handmade from white earthenware clay, bisque fired, glazed, then fired again for a shiny finish.


I've learned soooo much while making these.


Each of their imperfections is a lesson learned.


How much glaze to apply. How to achieve a flat edge. How to properly affix those little chimneys. How long to fire. How... how... how... So many variables to figure out!


And while the next batch will absolutely be closer to 'perfection' this big batch of cottages are utterly charming with their dents, wobbles and drips.


If you'd like to snag some of these little cuties, I have ten sets available in my etsy shop. Each set includes 5 ooak houses in a variety of sizes and styles. Scoot on over HERE to grab a little fairy-sized town of your own.

Thursday, January 11, 2024

Microwaves, kilns, and learning curves

Mr. Pixie gifted me a microwave kiln for Christmas.

'The heck is a microwave kiln' you ask? Its a little round chamber you pop in the microwave that heats up and allows you to fire pottery, metal clay, and glass fusing.

When you get a microwave kiln that also means you need a microwave, clay, safety gloves, glazes, kiln paper, a million little bits and bobs and a whole whack of patience.

Earthenware buttons bisque fired in microwave kiln

It seems unreal that you can create little clay objects and successfully fire them in a microwave, and to do so in a fraction of the time it would take in a regular kiln. And yet, fire it does.

There's definitely a learning curve and much experimenting, and trying, and practicing, and failing! But there's a joy in that part of the creative process, and so much satisfaction when you manage to pull your experiences together and say "Wow! I learned a new skill!"

Glazed buttons ready for second firing.

I'd read a bunch of posts/comments that said that glaze firing would be impossible in the microwave, that temps required would not be possible... but I've seen loads of projects that prove the contrary, and managed some really cute results myself. Just look at the shiny happy buttons below

Finished glazed handmade buttons.

While you'll be seeing clay projects pop up in my timelines, I probably won't be doing any tutorials for using a microwave kiln. There are just too many variables to consider (clay type, humidity, kiln size, microwave wattage, direction of the wind, alignment of the planets) and that makes tutorials difficult when many people need/want specific direction.

All that said, if you've been considering grabbing one of these hot little gadgets, go for it! I've had soooo much fun with mine over the past couple of weeks. If you're a craft nerd who loves the process of learning, you'll likely find this a rewarding addition to your creative arsenal. 

Be safe & have fun!

Wednesday, December 27, 2023

Tattoos, Lil Peep, and Homemade Gifts

Every year I make my kid at least one gift for Christmas. In the past I've made a needlefelted sasquatch, a miniature brick wall for graffiti, a needle point that read 'Liquor and Whores'... I try to make a little something that reflects something he's been interested in that particular year.

This year my son has been on and on about old school tattoo flash. I saw some super cool examples of wooden artist hand models that had been painted with tattoos and knew that was just the thing to make this year.


Then my kid shared his Spotify roundup and his top artist was Lil Peep. I actually painted a portrait of Lil Peep for his Christmas gift a couple of years ago so I knew that he's one of my sons favourite artists, and that he was heavily tattooed. I figured I'd include a nod to him too in my little piece. 


I dabbled with the idea of replicating Lil Peeps hands as they were covered in tattoos, but then the issue became displaying the hands. The model sits on a flat base, fingers pointing up. This would mean that any wording on the hands would be upside-down when displayed. Instead of being faithful to the inspiration, I made a mashup of old school flash and tattoos that adorned Lil Peep.


Many of the Lil Peep source photos I used showed his nails painted bright red, so I included that detail too.

I'm pretty happy with how this piece turned out and hope my kiddo loves it. Making people things that reflect their loves and likes is such fun :)

Hope you had/are having a lovely holiday, sweet friend. And now, I, for one, am going to have a much deserved nap on the couch.


P.S. You have no idea how many times I typed Lil Poop while writing this.


Saturday, December 16, 2023

Victorian Inspired Gilded Walnuts

I've been feeling inspired lately and there were LOADS of holiday projects on my to-do list but the days are quickly running out. I've become rather partial to a slower pace, to investing time rather than running myself ragged, and so I'll cut my holiday list short and just post one last project.

But it's such a cute project.

I think you're going to like it :)


Can you even?! I cannot!


This isn't the first walnut project I've done, but I was inspired for a revisit after watching THIS youtube video from Serena Dyer that featured instructions for Victorian gilded walnuts. I ask you, who doesn't need something shiny and precious? How could I help myself?


I made some modifications from the inspiration video, and learned a few things along the way. I've made a video of my own process which you can find HERE but here are some of tips that you'll want to keep in mind if you want to make some of these beauties:

• I had the best results using a butter knife to split the shells

• Don't get hung up on how many shells don't split perfectly (I had about a 40% success rate) Buy extra nuts and don't worry about it.

• Keep your shell halves together so that you don't have to search for matching pairs later on

• Tape the halves together while your glue sets to keep everything in place

• Be careful when removing the tape! Pulling it off too fast can cause the two halves to twist slightly and put strain on the hinge 

• Consider using gilding paste, it makes a BIG difference when applying the gold leaf


And while I did make some of these lovely trinkets with a vintage Christmas feel, these don't have to be just for Yuletide. How lovely would these be to hide a love note? A birthday wish. Maybe a little something made for no reason at all.

Here is the supply list (exact products linked but feel free to substitute):
• walnuts
tiny hinges
gilding paste
gold leaf
• flat back nail rhinestones (I believe I used 1.5mm)
• ribbon (optional)
• miscellaneous items for filling: acorns, mini vintage images, faux greenery/plants, coins, love notes, rings, jewelry, moss, faux mushrooms, mini eggs, treats/candy, bells, mini vials, fake snow. charms

Now, off you pop! Go! Make some beautiful golden treasures :)


Saturday, December 02, 2023

Swooning Into the Woods


I've been watching the hell out of YouTube Christmas craft tutorials lately. My poor husband has been subjected to HOURS upon HOURS of them. Somewhere along my binge I saw a video of image transfers onto polymer clay.

Hold. The. Freaking. Boat.

IMMEDIATELY I tried my hand at them using the video instructions and the results were just sort of ok. I did a deeper dive and... I'm obsessed! I became so obsessed I created a new collage sheet specifically of images I wanted to slap on every bit of polymer clay in my stash!


You can find the sheet HERE in my etsy shop. I'm going to be super cheeky and say it's really lovely. It's filled with all sorts of things you'd find on a walk through the woods: hares, hedgehogs, frogs, acorns... it's packed with really sweet images. I think you'll love it. 


There are a few little wrinkles I want to iron out, so I'm not quite ready to share a tutorial yet. But you can jump right in by visiting the Sculpty website where they share image transfer techniques.


While these first samples are imperfect and wonky... I am so excited by the possibilities!


In addition to the image transfer, these pieces were antiqued with a bit of paint and have been gold leafed on the back, with a smattering of gold flakes on the front.


They're like beautiful old objects that have been worn by time and love.


Acorn caps and twine and ribbons <3


The only problem with these gorgeous wee trinkets is that I know they're going to distract me from my holiday making, which I am totally behind on.


Ah well, I'll just have to call in a favour from Father Christmas to pick up my slack. Hopefully the promise of his favourite cookies (ginger spice) and an Irish coffee will do the trick.

Friday, November 24, 2023

Roly Poly Snowmen with Tutorial
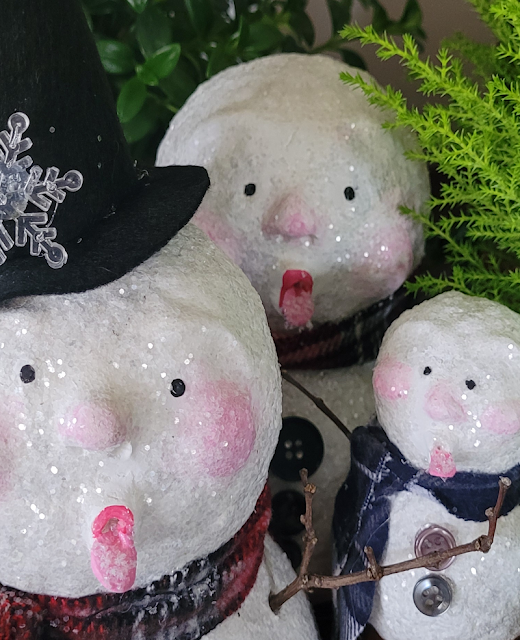
How stinking cute is this family?!

Want to add a little something to your holiday 'to-do' list? How about making a fleet of snowmen to assist you with holiday world dominance? Too much? How about just one roly poly snow dude to keep you company?

Ok? Let's go!


While these are pretty simple to make, you're going to need to take into account drying times. You'll need a few days to put these guys together, but they're totally worth the wait.

Here is your supply list:

• 2 styrofoam balls, one slightly smaller than the other (the size will determine your finished snowman size, 2 balls makes one snowman)
• skewer, poky stick, or small dowel
• paper napkin & painters or masking tape
• paper mache *see note below
• Creative Paper Clay
• white glue
• hot glue
• white, pink, black craft paint
• clear, transparent or translucent craft glitter **see other note below
• Mod Podge Dimensional Magic
• a tiny pinch of fake/buffalo snow (or more glitter!)
• twigs
• buttons
• fabric for scarf
• optional - felt for hat & other accessories


*Notes about paper mache:

Dry, prepared paper mache fibre/cellulose in which you simply add water is available to purchase, but you can absolutely make your own for very little money.

For this project, I made my own paper mache clay by tearing up an egg carton and toilet paper then covering that with hot water. After an hour or so I blended the softened papers in a food processor then poured that slurry through a sieve and squished out most of the water. To that I added a handful of flour, cheap white glue and a splash of vinegar. I mixed up that mess and kept in the fridge until ready to use. If you need exact measurements there are loads of recipes online (I found THIS page really helpful and informative) but honestly, precise measurements aren't necessary.

Or, you could go really old school and use strips of paper with four paste.


** Note about glitter

I use Creatology Glitter in the colour "clear", which can be found in the kids crafting area of Michael's. It's transparent, sparkly and cheap. Here's what the package looks like: 


I prefer using clear/transparent/translucent glitter over white glitter because it allows the colour of the rosy cheeks to show through. I also like this glitter because it does not scratch. Some clear glitter is made from glass and is actually quite sharp and scratchy.

If you have a preference for other materials, just do a little experimenting on your own and see what works best for you. The only 'right' way, is the way that works best for you.

Got all that? Great! Now here's how to put all those things together to make your own roly poly snow dudes... Have fun!