Saturday, May 06, 2017

The Collector's Room Box

This month's theme at AlphaStamps.com is "Collector's Room". The kit features a chipboard window to create a little scene within... but I've gone rouge err... rogue and created a collector's room with the new
Small Frame Shadowbox.

I wanted to create a space filled with bits that might have been collected on adventures, an assortment of oddities. A sort of kooky gentleman's library, or study.


Every gentleman's library needs books. These shelves are filled with them! Well... not really... they're simply facades cut from the Window Card Cabinets Collage Sheet.


Another 'must have' in a real gentleman's study is a stag head and the Mini Deer Head Trophy is perfect!


There are A LOT of amazing little oddities in my collectors room. All of the products used are listed below but some of my very favouites that deserve and extra shout out: Miniature Flying Bats, Pewter Candlesticks, Ceramic Gargoyle Bead and perhaps my favourite little bauble of all the wee Ceramic Red Devil Bead.


This wee American Crow ain't so bad either!

Here's the full list of supplies if you want to create your own collectors room, or if you just see something you might fancy.

Friday, May 05, 2017

Super Simple Earring Organizer

This project is sooo easy AND you'll be able to make three with as little as just one product! Are you ready?


I've simply taken Gypsy Soul's Decorative Screen, applied a coat of paint, added a length of ribbon, and created an organizer for my dangly earrings. This is a serious improvement over plonking them in my jewelry box and creating a tangled mess. I just used the cut areas to hang my sparkly fake jewels from.


The Decorative Screen comes with three panels, and my little organizer only uses one, so you can use the other two parts for gifts, to sell, or if you have a bazillion pairs of earrings, to keep all to yourself. I've created three in three different styles.


You could put all the panels together to create a complete screen to sit on your dresser but I really like the hanging ribbon that lets me cart my jeweled bits all over the place depending on where I'm getting myself gussied up.


I'm certain you don't need any guidance for this project, but HERE is a video for creating the above Steampunkish version of this project.

The only extra bit of advice I'll give is that it's probably best to be a little restrained in your embellishing if you want this to be a functional item.


The bare necessities you'll need for this project:
Decorative Screen
Acrylic paint
Length of ribbon

If you want to get fancy add decorative elements such as Flourishes, or any shapes that suit your fancy. Additional elements I've used are:
Faux Metal Number Plates
Faux Metal Number Plates 1 to 25
Faux Typewriter Keys Symbol Set
Gears Shape Set
Stackable Labels Shape Set

Now, go make something perfectly suited to you!


Tuesday, April 25, 2017

A tin can planter

I made a tiny something for my kitchen window.


It's just a tin can gussied with paper and canvas ribbon and filled with moss and pretty flowers... but it looks nice, especially on a drizzly day.

I hope you've been behaving yourself. I miss you.

Thursday, April 13, 2017

Stones and Small Sparks

I have a theory. 

I think that fairies start out as tiny sparks of energy and are sort of incubated within things like trees, seeds and rocks. They grow and form until they can no longer be contained and break free.


Every time I see a split rock I'm quite sure that another fairy has burst into the world.


There's something wonderful about those split rocks and the energy required to break them open.


There's a lot of them around here, those split rocks, and I wanted to do something to celebrate them.


I thought of painting an egg and a bird inside, or other things that fit together... but I decided to start with night and day. After all, that's how most creation stories begin.


And now... what? 

Perhaps I'll tie those pieces together with a length of golden thread and place it back out in the world.

Or maybe, just for a a little while, I'll keep night and day by my bedside as a reminder of the magic in small sparks of energy.

Wednesday, April 12, 2017

A shrunken head

I've had a really great couple days creatively speaking. I feel motivated and WANT to work. Last night I completed three... THREE... projects, including this dude.


He's been sitting around here for about 2 years waiting to be completed and last night I had my way with that bad boy!


I'm pretty pleased with him. I like the age he has. That crusty dusty look was achieved with baby powder atop of wet paint. It's looks great... like aged grime and dust. 


He's made from this sort of light and foamy air dry clay that I distinctly remember hating but can't for the life of me remember the name of. I must have blocked it from memory.


Just some terrible foam clay, string, jute twine, faux fur hair, paint and baby powder and you have yourself a shrunken head that only took a bazillion years to make.

Now, he needs a name... any suggestions?

Tuesday, April 11, 2017

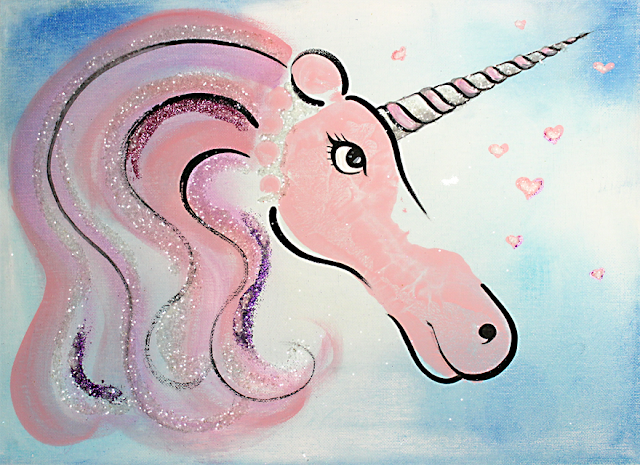
Sparkly Foot Unicorns (or Getting Weird for a Good Cause)

Just look at these....


Sparkly footprint unicorns. Can you even stand the cuteness?

This is not my idea. It's a slightly grown-upper version of a kids craft. I figured I'm a big kid, plus this would be fun to do drunk AND sparkly unicorns!

After I posted my first attempt at these, I was asked if I might donate one to a charity auction. I'm not sure how much my feets will fetch, but I'm absolutely down with trying to raise a few extra pennies for The Marvelle Koffler Breast Centre at Mount Sinai Hospital. Because screw you cancer.

Anyway, they were a ton of fun to do and here's how to make your own...


Gather all your stuff. You'll need water, a towel and wash cloth, paper or canvas, acrylic paint, a brush, a pallet/dish, glue and glitter. Pink toenails help... I don't know why... they just do.


Rather than dip your foot in a tray of paint, it is much easier to paint the bottom of your foot. Water the paint down, apply, then step diagonally onto a piece of paper. 


Work quickly before the paint has time to dry. Also, remember to position your footprint so that there is room for the horn and mane.

This is really messy business, especially if you make this after a glass (or three) of something boozy. Consider your work area before you start, and remember that towel! You do not want to be hobbling through the house with a painty foot.

When your print has kinda sorta dried you can add the cascaded mane...


... and the horn too. I didn't get too picky here. I just sort of blocked those extra bits in.


It doesn't really matter which side of the foot the horn is added to, the pinky side or the big toe, but I think it looks especially cute when you use the big toe as an ear like below.


Once the mane and the horn are dry, add some black edges to give definition and detailing.


Then add glue and go nuts with the glitter.


For my charity unicorns I used canvas instead of paper. I also prepped the background with a wash of blue paint and added stars and hearts... because apparently unicorns and glitter just aren't enough.


That's it! Easy peasy. The auction will take place at a live event, but you can still donate to The Marvelle Koffler Breast Centre at Mount Sinai Hospital HERE.

Sparkle on weirdos!

Saturday, April 08, 2017

Dapper Gents ATC's

 It's Dapper Gents month at Alpha Stamps and I've made a batch of suuuper simple ATC's


I really didn't fancy at all with these guys. Just Men Collage Sheet and Satisfying Text Collage Sheet images, paper from the Dapper Paper Pad, and mounted on a Chipboard ATC base.


Any other additions are just tiny scraps of dresden, washi tape and other little bobs.


They're really just very cute and super fast crafty something. Nothing too fussy going on here and they're swell nonetheless.


I've used these same collage sheets for some rather saucy versions which can be found HERE if you're not faint of heart.


But there's ain't nothin' wrong with the PG versions! They're a load of fun daddio!

Don't want to be a square? Here's all the bit's you'll need to make your own...

Men Collage Sheet
Satisfying Text Collage Sheet
Dapper Paper Pad
Chipboard ATC
Doodads, scraps and this and that

Or just scoop up the Dapper Gents Kit!