Wednesday, April 25, 2018

Pretty Flip Book

It crossed my mind to use this standing flip book to create something practical . I had thought of maybe a daily "to-do" list, or daily affirmations and meditations. That didn't happen. Practicality went out the window and I just made something pretty.


I dug deep into my paper hoard and used papers from my Graphic 45 days. I've used a mish-mash of older collections, I mostly used Botanical Tea and Time to Flourish.


I added a little sort of nest of flowers at the base... again busting the stash!


Assembly was SUPER simple. I only have two bits of advice... 

1. Be wary of adding a large design element at the top. It's so temping, but it may hinder the flipping of the pages.

2. When assembling the base leave the areas that slide together unembellished. This will help the pieces to fit together much more easily.


You know, I've always been more of a silver fox than a golden girl... but this gold dresden may be  swaying me to the other side.


Most of the butterflies I've used have been fussy cut from the G45 papers, but the ones below are stickers from... the dollar store! Aren't they pretty?!


The flip book comes with 6 chipboard pages so there is loads of room to play and experiment.


I was rather heavy handed with the dimention on the pages and there was still loads of wiggle room. You could easily add plenty of your own additional pages.


Want to make your own pretty flip book? You'll find the supply list below.


Supplies List:

Standing Flip Book
Faux Metal Number Plates 1 to 25
Graphic 45 papers
Metallic Dresden
Twig Vine Garland
Paper flowers
Flatback pearls

Tuesday, April 24, 2018

A little extra something

The author of my very favourite magical books ordered something from me the other day. Woo hoo!


It gave me an excellent excuse to make tiny versions of her books to tuck into her package.


It's also an excellent excuse to let you know about her work. If you're interested in magical things, Judika's encyclopedic books are a wealth of information. 


Buy some books! Learn some magic! And have a beautiful day my lovelies xoxox


Monday, April 23, 2018

The Monarch's Crown

I've been attempting to organize and destash. It's a bit like Christmas, rediscovering old ideas and inspiration along the way. I come across pieces and think "Oh! I was going to..." or see a sheet of pretty scrapbook paper and become enchanted.


This crown was a bit like that. I was going to make it back in September but life got in the way (as it often does). As I cleaned and sorted through my supplies it poked me and nagged to be made.


Spring had snuck off to make way for an ice storm, so something bright and cheery and golden was definitely in order. Is there a better way to wait for a natural disaster than feeling regal in a paper crown? I don't think so.

I think that paper crowns are the crazy craft lady version of the tinfoil hat. They keep bad thoughts away and make you feel glam while thinking good things.


I had thought about adding more... more sparkly elements, a focal piece... but I think the butterflies do well by themselves.


Crowns are gloriously fun to wear and you very nearly cannot feel bad wearing them. If you require a crown for your own noggin' here are the supplies I used to create my "Monarch Crown".

Gypsy Soul Chipboard Crown
G45 Couture: Accessorize
Authentique: Mysterious 2
BoBunny: Enchanted Harvest Butterflies
Gold Star Picks
Narrow Gold Dresden Diadem or Crown

Glitter
Acrylic paint


Thursday, April 19, 2018

A little magick

Hello you! I've been working hard on loads of new wee things but haven't had much in the way of finished goodies to show off. BUT I set my mind to it, determined to to give you something to oogle, and here we go...


Three little dressers topped with magical bits and bobs.


Today just happens to be Saint Expedite's feast day and I just so happened to top this piece with items just right for offering him. A little beer bottle, cake and candles.


Just 3.5" x 5" and available HERE

Or maybe you need some help in love? A honey jar spell, a bowl of herbs, a figure candle and incense too.


3" x 6" of love magic is available HERE


If you're looking for jinx removal and protection, I've got you covered there too!

Books, wand, scrying tools, candles and more! This piece is available HERE.


And speaking of those candles... how cute are they?! Real glass filled with real wax. I might even go off the deep end and attempt to add a wick. They were an experiment that went extremely well so I've only got a handful to offer, but I'll have a limited number listed soon, then more in the near future.


Couple of other items you may find useful: Fortunes Told Collage SheetTiny Wooden BowlsHalf Scale Antiqued UrnPewter Dollhouse Dishes

P.S. I MADE IT! Seriously! I can't believe that I managed to sneak my way into being a Graphic 45 brand ambassador. So chuffed and really, really thrilled. Thanks for all your nice words xoxo

Thursday, April 05, 2018

Graphic 45 2018 Brand Ambassador Audition

Some of you may recall that a few years ago I was on the Graphic 45 design team. It was a lot of fun, I learned so much, and (best of all) I made such nice friends.

So, when I saw that Graphic 45 had announced a Brand Ambassador Call... well I couldn't help myself.


I've made an extra special project with a new video tutorial just for the occasion.

Paper Fairy Frock with Tutorial - Nichola Battilana

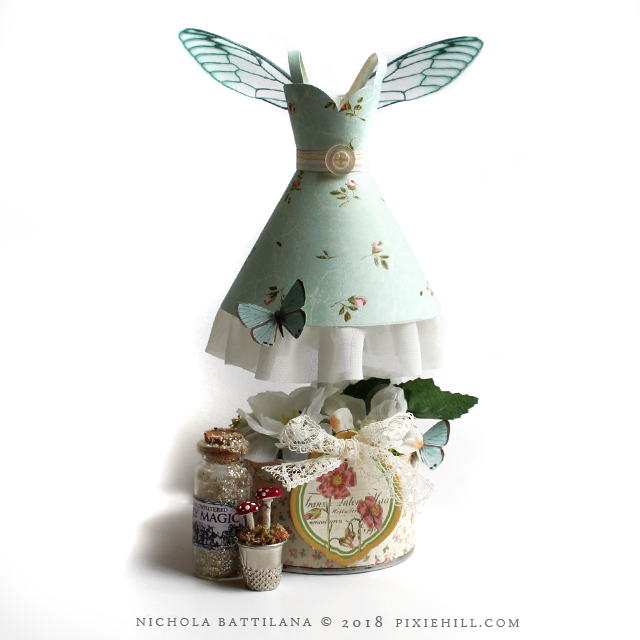
Paper fairy frocks! It's the sort of project that ticks all my boxes... moderately simple, uses few supplies, and easily customizable. As a bonus, there's a bit of recycling in there too!

Paper Fairy Frock with Tutorial - Nichola Battilana


I've used Graphic 45's Baby 2 Bride Classic Collection "Birdy Baby Blues" with a smidge of Botantical Tea for this frock. But don't let that limit your imagination! You can make these to suit just about any taste or theme.

Graphic 45 Paper Fairy Frocks with Tutorial - Nichola Battilana

Seriously, how cute would these be for a shower? Or a ladies lunch? Or sweet 16?!


Something chic for the fashionista with Couture.

Graphic 45 Paper Fairy Frocks with Tutorial - Nichola Battilana

Or perhaps something playfully psychobilly with Rare Oddities

Graphic 45 Paper Fairy Frocks with Tutorial - Nichola Battilana

I think they are all sweet as can be.

Are the possibilities swimming in your head? Are you ready to create your own? 
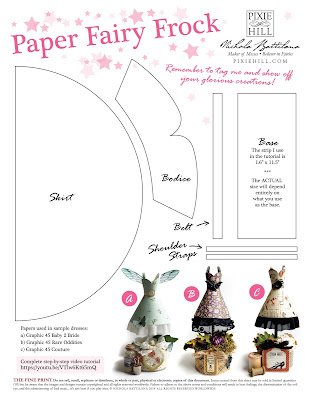
Download the template below. CLICK HERE if you're having trouble

Paper Fairy Frocks with Tutorial - Nichola Battilana


Here are all the supplies you'll need:

Scrapbook paper
(Graphic 45's Baby 2 Bride Classic Collection - Birdy Baby Blues is used in the video sample)
Pleated Ribbon
Empty container for base
Florist Oasis/Foam
Moss
1/4" wood doweling
Fairy Wings
Buttons, faux flowers and leaves, ribbon, embellishments
Adhesive

And... AND... my second audition project: a mini mini album!

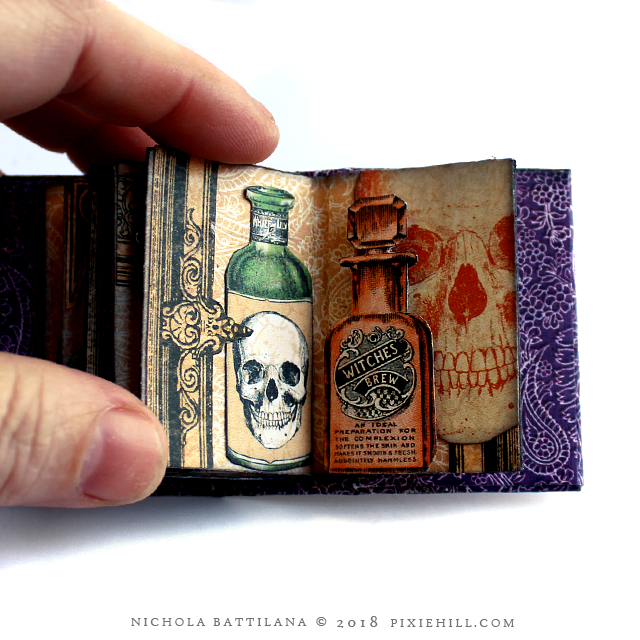
Graphic 45 Rare Oddities Mini Mini Album - Nichola Battilana

And I do mean mini! Just 1.25" x 2" made with Graphic 45's Rare Oddities. 

Graphic 45 Rare Oddities Mini Mini Album - Nichola Battilana

Now, I will be the first to admit that mini albums are not one of my skill strengths, BUT I think that my sense of crafting adventure IS my absolute biggest strength.

Graphic 45 Rare Oddities Mini Mini Album - Nichola Battilana

I love crafting. It's fun. It brings me joy. That joy comes from exploring, playing, experimenting and fearlessly making mistakes. Loads and loads of mistakes.

Graphic 45 Rare Oddities Mini Mini Album - Nichola Battilana

I glue my fingers together regularly. I mismeasure and cut where I shouldn't. And that's ok! Everyone does it. Every one of us starts somewhere.

Graphic 45 Rare Oddities Mini Mini Album - Nichola Battilana

While this finished the project may look spiffy, the two prototypes I made before were a mess!

Graphic 45 Rare Oddities Mini Mini Album - Nichola Battilana

And those two messes? They are soooo important because, cross my heart, the trying, the doing, the mistakes and messes, they are the most valuable creative tools you have. Never ever be afraid of mistakes (unless you're a beginner knife thrower).

Good luck to everyone auditioning for Graphic 45 Brand Ambassador. I've seen a load of other audition posts and there are some fiercely talented folks auditioning. If you're on the fence about applying... GO FOR IT! DO IT NOW!!! You have until the April 8th, 2018 to apply.

Wednesday, April 04, 2018

Fairies and bunnies and gnomes OH MY!

This is a post Easter easter post for AlphaStamps.com The consensus being that these lovelies are cute enough to be used beyond bunny day.


These sweet fairy pieces were actually an after-thought to use the extra bits in my kit but Im smitten with them. The background is just a square of cardboard (I literally cut off chunks from the shipping box!). I used pages from damaged hymnals to make them pretty.


I used foam squares behind painted Easter Covers for Mini Shadowboxes to provide some depth. I chose to paint the covers to make this a super easy painless little project..


Sheet Moss and paper flowers and leaves are tucked into the edges.


And finally fussy cut wee winged imps from the Pink Childrens Theater Collage Sheet and paper butterflies from the English Fairy Garden collage sheet are added! So cute!


And some other cute as buttons easter-ish pieces...


I just love this wee gnome buddy! Isn't he the cutest?! Topped with a 14mm Clear Flat-Back Acrylic Rhinestone Star.

(P.S. Don't tell AlphaStamps but that adorable colourful rhinestone trim is just from the craft aisle at the DollarStore!)


How perfect is the White Dresden Border here?


And that Pink Acrylic Bunny Cabochon! Can you even stand the cuteness?

If you'd like to make something similar, here are a few tips...


I am not a fan of trimming edges so instead I painted the lid white...


...then covered the edges to the scalloped edge...


 Cover the top of the box.


And use dresden trims to hide the edges.

You can see above that Ive also used paint on the exterior sides of the bottom of the box. I knew that the lid would fit snugly and did not want to add extra bulk with thick paper.


To add a bit of height to the interior you can use florist foam...


... and cover with moss.


And that adorable bunbun? I added a chunky bead to the back to help keep the wee thing in place.


Then just glue all those other fun bits into place. So much adorableness!

Think you're up to it? Here's the supplies I used for the above projects...

Mini Shadowbox Lid - Easter Egg
Mini Shadowbox Lid - Small Bunny
Mini Shadowbox Lid - Chocolate Bunny
Mini Shadowbox - 2x3
Mini Shadowbox - 3.5x5.5
Mini Shadowbox - 2.5x4
English Fairy Garden Collage Sheet

Pink Childrens Theater Collage Sheet
Gold and White Lace Sticker Sheet
Sheet Moss
Paper flowers and leaves
14mm Clear Flat-Back Acrylic Rhinestone Star
2 inch gnome
Pink Acrylic Bunny Cabochon
White Dresden Border
Tiny Wicker Basket with Handle
12mm Bird Eggs
Double Dot Passion Fruit Pink Scrapbook Paper
Double Dot Mint Green Scrapbook Paper
Double Dot Powder Blue Scrapbook Paper

Acrylic paints
Glue
Florist foam