Friday, November 24, 2023

Roly Poly Snowmen with Tutorial

How stinking cute is this family?!

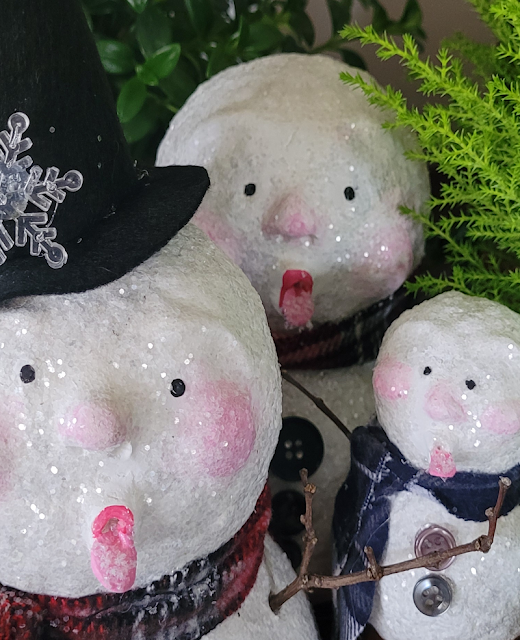
Want to add a little something to your holiday 'to-do' list? How about making a fleet of snowmen to assist you with holiday world dominance? Too much? How about just one roly poly snow dude to keep you company?

Ok? Let's go!


While these are pretty simple to make, you're going to need to take into account drying times. You'll need a few days to put these guys together, but they're totally worth the wait.

Here is your supply list:

• 2 styrofoam balls, one slightly smaller than the other (the size will determine your finished snowman size, 2 balls makes one snowman)
• skewer, poky stick, or small dowel
• paper napkin & painters or masking tape
• paper mache *see note below
• Creative Paper Clay
• white glue
• hot glue
• white, pink, black craft paint
• clear, transparent or translucent craft glitter **see other note below
• Mod Podge Dimensional Magic
• a tiny pinch of fake/buffalo snow (or more glitter!)
• twigs
• buttons
• fabric for scarf
• optional - felt for hat & other accessories


*Notes about paper mache:

Dry, prepared paper mache fibre/cellulose in which you simply add water is available to purchase, but you can absolutely make your own for very little money.

For this project, I made my own paper mache clay by tearing up an egg carton and toilet paper then covering that with hot water. After an hour or so I blended the softened papers in a food processor then poured that slurry through a sieve and squished out most of the water. To that I added a handful of flour, cheap white glue and a splash of vinegar. I mixed up that mess and kept in the fridge until ready to use. If you need exact measurements there are loads of recipes online (I found THIS page really helpful and informative) but honestly, precise measurements aren't necessary.

Or, you could go really old school and use strips of paper with four paste.


** Note about glitter

I use Creatology Glitter in the colour "clear", which can be found in the kids crafting area of Michael's. It's transparent, sparkly and cheap. Here's what the package looks like: 


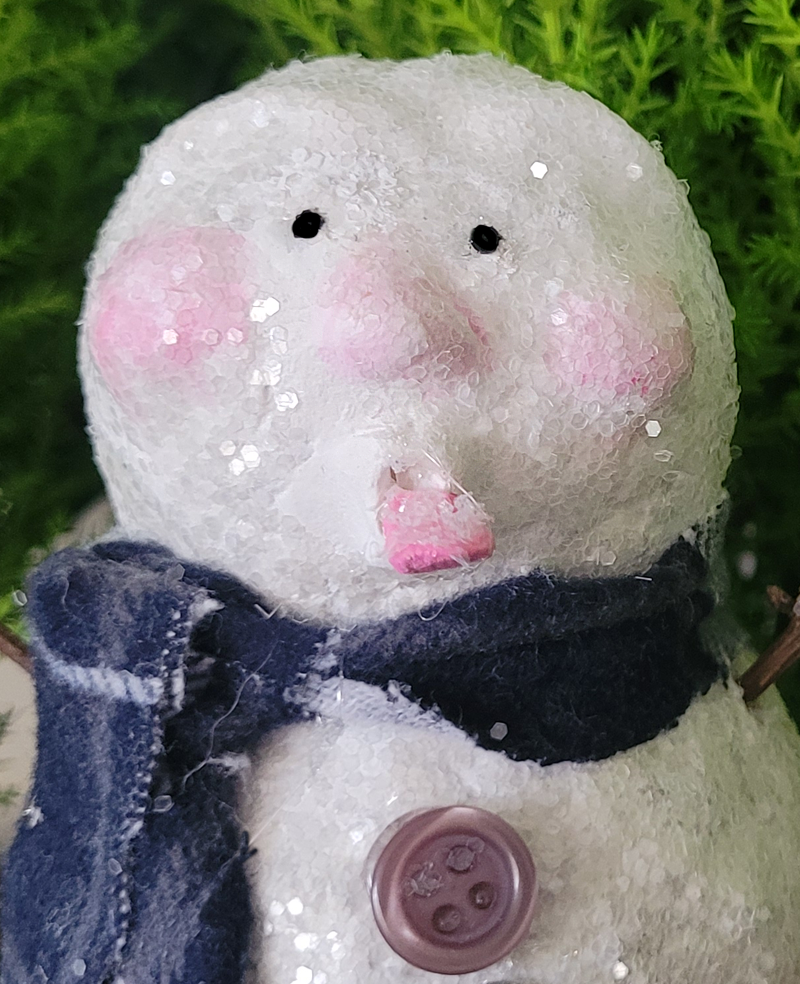
I prefer using clear/transparent/translucent glitter over white glitter because it allows the colour of the rosy cheeks to show through. I also like this glitter because it does not scratch. Some clear glitter is made from glass and is actually quite sharp and scratchy.

If you have a preference for other materials, just do a little experimenting on your own and see what works best for you. The only 'right' way, is the way that works best for you.

Got all that? Great! Now here's how to put all those things together to make your own roly poly snow dudes... Have fun!


Tuesday, October 31, 2023

Halloweeny: A Pendulum and Board

Happy Halloween and Samhain Blessings, darling friends!

I finished off one last Halloween project to share with you. A pendulum and board (I've also seen it called a pendulum map).

Halloween has long been believed to be an ideal time for telling fortunes and divination. I have an old book from 1912 called "Games For Hallow-e'en" that is filled with games to divine ones future... especially in matters of love. Ooh lala!

While playing with resin I had this idea to incorporate herbs for their magickal properties. Making a pendulum filled with psychic enhancing herbs seemed ideal.


So, while pouring my resin into the mold I added crushed herbs, spices and roots that are believed to boost ones ability to divine the future. While some may not agree with using resin or other non-natural materials in their craft, I say "Why not use every tool at your disposal?" Shake it up, baby!

A length of gold chain, findings, a sun charm and the pendulum is ready to answer all my pressing questions.


I had an entirely different vision for the pendulum board, but things didn't work out as planned.

A gradient of blue hues was used to paint a wooden hexagon. Then I took to the computer to come up with a design and used my Silhouette to cut it out of gold vinyl... then I went back and adjusted the whole design because my lines were too thin, stars too small and lettering all wrong. 

In the end, I'm super happy with this little piece and will ask it all sorts of questions by candlelight this evening.

Will grocery prices continue to spiral out of control?

Am I on Santa's 'nice' list?

Will my husband take me to 'wing night' on Thursday?

You know, all the big important questions.

Have a beautiful Halloween, my friend. May all your fortunes be good.


Monday, October 30, 2023

Halloweeny: A pumpkin cottage

I've had a number of pumpkins waiting for attention for a short while. I managed to get two of them gussied up for Halloween yesterday. Here's a pumpkin cottage I made for my faerie folk!


Its so stonkin' cute. I just used little resin windows and frames that I had in my stash (I believe they're from Prima Marketing and Michaels) and then added other mini bits I had laying about for the extras.

Here's a short clip of me putting it all together.

Tuesday, October 24, 2023

Halloweeny: A Crown for a Spooky Queen

Hoooo baby! I am feeling like a spooktacular queen in this creepy crown. 


Seriously though, I've been a crown proponent for ages and I remain strong in my stance... a crown can absolutely change your mood and uplift. I need one for every occasion, including spooky season.


Just look at that shiny black resin skull. *heart eyed emoji here, right?!*


Spiders, skulls, bones, flowers and stringy cobwebby bits!


Want to make your own? I put this together using the same method as seen in this tutorial, swapping out spooky bits for flowers and fairy wings. Quick as rabbits, get your fingers working and we can be spooky queens and kings together.


Sunday, October 22, 2023

Halloweeny: A Creepy Clock

I made a spooky thing! A creepy clock! A terrifying timepiece!


A few weeks ago I saw this clock at HomeSense and immediately wanted to make my own.


After searching thrift store for a couple of weeks I finally found a clock that I could use as a base for my own creepy timekeeper.


I cleaned it, sanded it, and covered it with cheap skull beads and other spooky bits from my stash.


I coated the whole thing with black paint, then applied some light paint with a dry brush to bring out the details. 


I actually love the solid black version and might revert back to it at some point, but for now...


... this creepy thing will sit on my mantle in it's current spooky state.


I considered changing the clock face too, but I like the filigree pattern and think it suits the piece, so it stays.


Here's the inspo and my finished piece. I like them both, but I'm proud of the one I hobbled together.

Pop over to THIS insta post to see the making of this piece.


Hope you're good and making your own messes xoxo


Thursday, October 19, 2023

Halloweeny: 1 Matchbox, 9 Clovers and a Very Strange Day

What a strange morning!

Took the dog for an extra long walk today and found a whole bouquet worth of four leaf clovers. Just kept finding one after another. Eight four leaf and one five leaf in total.

Continued on our walk when the pooch spied a squirrel... annnndddd he was off like a shot. Nooooo! He ran down a steep wooded hill and I stood shouting from the top. Nope, jerk face was not listening. I took my clumsy life into my hands and started to descend the steep af hill. A few feet down and I spied a little bum sticking up out of leaves. It was a god damn gnome! At that moment the dog suddenly took notice of me and came trotting up the hill, pleased as punch.


You can think what you like, but I'm certain Mr. Gnome sent that squirrel to alert a rescue party. Of course I brought him home and I'm pleased to report he's now safe and convalescing nicely. Lu, my beast, is napping from all the excitement.

And now, on to the matchbox...


Rummaging through my work space yesterday and came across some cute Halloween stuff in my stash. While waiting for glue and paint to dry on other projects, I tossed this cute wee spooky matchbox together.


Is it mad creative and an example of fine crafting skills? No. Not in the least.


Is it adorable and does it make me smile? Fuck yeah!

Hope your day is weird and filled with wonder too xo


Thursday, October 12, 2023

Halloweeny: Money Paw

 Have you heard of monkey paws and their ability to grant wishes?

Only problem is, as with most wishing mechanisms, everything gets turned sideways and you'll regret not heeding that old adage "Be careful what you wish for". Why can't monkey paws, leprechauns and djinn just let us be rich and successful rather than ply us with their this trickery!?


This paw is quite harmless as it's made from a skeleton hand salad tong and not a real monkey.


I chopped up the hand to give the proportions I wanted, then sculpted up some monkey flesh using air dry and paper clay.


For the nails I used acrylic press on nails and grunged them up a tad. The 'fur' is wool roving.


And to get that sort of shiny dehydrated mummified flesh, I painted the piece with black acrylic paint mixed with Mod Podge.

Now, if you knew this monkey paw could grant wishes BUT you were also aware that it was a tricky bugger... how would you phrase your wishes so that you didn't get scammed by the sneak?