Showing posts with label spooky. Show all posts

Wednesday, October 12, 2016

Miniature Funeral Carriage

Something a little dark but (I think) lovely today. A miniature funeral carriage, inspired by beautiful Victorian horse drawn hearses.

The Funeral Coach base is a chipboard kit available from AlphaStamps. Inside I've slipped a 6 Inch Coffin Box

Makers note: I actually didn't include the coffin lid and simply used the main part box upside-down. I trimmed the coffin height down as I was considering adding flowers, or a traditional funerary wreath to the top and was thinking of the available space.


The whole carriage is painted in matte black and gussied up with LOADS of black dresden borders. (I think I have a serious dresden fetish. It's like Franks Red Hot. I put that s**t on everything!)


I've also added loads of ornamental do-dads using Creative Paperclay* and this Silicone Mold - Architectural Flourishes. That particular material works really well with the matte black finish.


19mm Fancy Metal Drawer Pulls act as finials accents for the top. And there is the most lovely little Antique Brass Mini Trunk Lock on the back doors. 

Makers note: the rear doors aren't actually hinged in place. I am a horror show with hinges! They never seem to work well for me and I just make an awful mess. Since I don't plan on opening and closing those doors often, and they sit quite nicely without much fuss, I'm taking the totally lazy route and leaving them free.


I've lined the interior with Bright Red Suede Paper. If you're looking for a more 'authentic' feel, line that sucker in black. (I personally love the shock of red inside.) Finally, the windows. Many funeral carriages had swags of lush drapery inside but I was liking the 'clean' look of this little coach. I put together this Filigree Funeral Carriage Windows Collage Sheet with vintage fancy framework that can be printed on transparency sheets and glued into place. 

I'm smitten with this piece. It looks great on my mantle, and is a good size at somewhere around 10" x 6". Although it's intended as a Halloween piece, it'll stay out year round in my spooky old house ;)

Want to make your own?  
ALL THE BITS in one place

The list of individual bits:
Funeral Coach
Filigree Funeral Carriage Windows Collage Sheet
6 Inch Coffin Box
Creative Paperclay
Silicone Mold - Architectural Flourishes
19mm Fancy Metal Drawer Pulls
Antique Brass Mini Trunk Lock
Bright Red Suede Paper
Black Suede Paper*
12mm Flat Fancy Bead Cap - Bronze*
Baroque Dresden Borders - Black
Black Zig Zag Dresden Borders
Half-Round Dresden Borders - Black
Thin Fleur Dresden Borders - Black
Thin Looped Dresden Borders - Black

Wednesday, August 12, 2015

A Poison Tin for Alpha Stamps

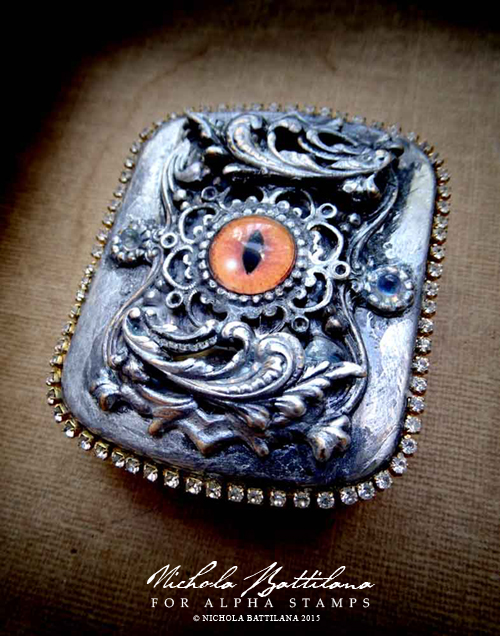
After months of airy fairy crafting it was a delightfully creepy surprise to get some spooky goodies from Alpha Stamps. And so, I'd like to present, a perfectly peculiar poison tin. 

 Poison Tin - Nichola Battilana


I've used supplies from the Magic Potions Kit and a few other bits and bobs. (The supply list can be found at the end of this post.) You'll notice that the front of the wee tin is lovely and ornate. I've achieved this look by layering Brass Feathery Scroll Filigree*,  some Flower Washers, and a few bezels... none of which were the same colour!


Poison Tin - Nichola Battilana

(Isn't that eye brilliant?! It's a 12mm Glass Cat Eye.)

Want to create a similar effect? Here's the process I used...

• Gather some flourished elements and start layering them, building a composition. Don't worry if their colour doesn't match... we'll help them to get along.

• Glue all of your pieces to the surface of the tin and allow to set. 


• Paint with a base coat of black paint. **Hint: multiple thin layers, given time to dry between coats, will work much better than a single thick layer of paint and preserves the details of the pieces.**

• Apply some silver acrylic paint. You may want to gently sponge off any excess.


• Apply a wash of dark paint to tone down the silver, allow it to pool in the crevices giving an aged look.


• With your finger, rub a little fresh silver paint to the highest areas.

The finished effect should allow you to combine different coloured elements to create piece that looks cohesive.

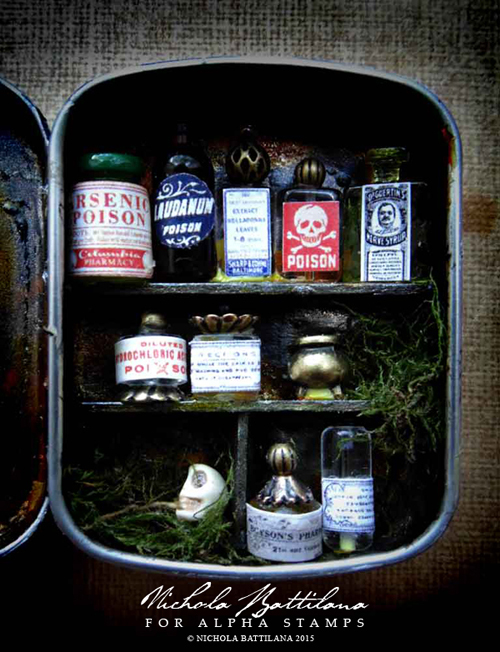
Let's take a look inside now...

Poison Tin - Nichola Battilana

Teeny tiny poison bottles! 

I do have a sneaky trick to share to save you some aggravation with those shelves. Instead installing the shelf then fiddling around to fill it in that small space, consider gluing the little bottles to the shelf first. Once dried, use the back surface of the bottles to glue into place rather than the small edge of the shelf. If using this method, be sure to consider the depth and height of the space you are filling.

Poison Tin - Nichola Battilana

And if you're itching for a supply list...

Magic Potions Kit
Brass Feathery Scroll Filigree*
Flower Washers
12mm Glass Cat Eye
Round Antique Bronze Filigree*
40x30mm Halloween Poison Cameo* 
Sheet Moss* 
E-6000 Adhesive*
Acrylic Paint

And a quick link to all the products used.