Showing posts with label gslcuts.com. Show all posts

Saturday, July 29, 2017

Starry Tags with Tutorial for Gypsy Soul Laser Cuts

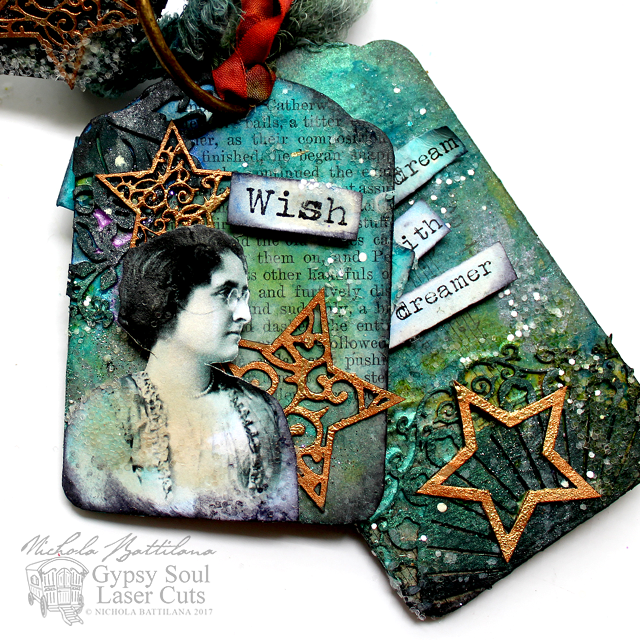
This month for Gypsy Soul Laser Cuts I've used their 3 tag set to create something starry and dreamy.

Starry Tags with tutorial - Nichola Battilana pixiehill.com gslcuts.com

With some layers of paint, chipboard stars and glitter those kraft coloured tags are transformed.

Starry Tags with tutorial - Nichola Battilana pixiehill.com gslcuts.com

They are the perfect backdrop for the sentiments and vintage images found on THIS Stars and Dreamers Collage Sheet (which is totally free to download because I love you.)

Starry Tags with tutorial - Nichola Battilana pixiehill.com gslcuts.com

If you need a little guidance putting these beauties together, I've put together a video tutorial for you.

Starry Tags with tutorial - Nichola Battilana pixiehill.com gslcuts.com

I do use a fair few layers of colour... but I honestly think that multiple washes add a depth of colour and visual interest that is incomparable to a slap of thick paint.

Starry Tags with tutorial - Nichola Battilana pixiehill.com gslcuts.com

But hey! if a thick coat of acrylic is your thing... go for it! Art and craft is all about YOU, the maker. I wholeheartedly encourage you to do what works for you.

Starry Tags with tutorial - Nichola Battilana pixiehill.com gslcuts.com

Here are all the bits I used to create these starry sparkly tags:

Gypsy Soul Tags
Keys Engraved
Printers Ornament Corners
Swirl Medallion Small
Deco Stars
Acrylic Paint (also used 
Glue
Glitter
Metal Ring
Ribbon/Fibers

Friday, April 07, 2017

Spring Fairy Altoid Tin with Tutorial

It's spring and my blasse mood is giving way to fairy dreams as the weather warms and the green shows through the grass. Swoon!


This month I'm going to show you how to create this pretty little altered Altoid tin with a sweet surprise inside.

On the outside I'm using an elmement from the Altoids Inserts Fairy Tale Frames,
Art Deco Corner Set and Faux Metal Number Plate.


I've used paper from Lemoncraft, but you could use any paper you love and make this project entirely suited to your own tastes.


Inside, I've used more elements from the Altoids Inserts Fairy Tale Frames. Behind the frame I've layered elements and images to give a dimentional effect.


This project is pretty dang cute and fairly easy to recreate, but I've made a demonstration video with some pointers that you might find useful.


Ready to make your own? Here's all the baubles and doodads you'll need:

Altoids Inserts Fairy Tale Frames
Art Deco Corner Set
Faux Metal Number Plates 1 to 25
Blank Altoids TinsScrapbook Paper (I've used Lemoncraft's Forget-me-not)
Foam squares
Glue
Gesso
Acrylic Paint
Glitter
Embellishments!

Friday, January 06, 2017

Pins for Every Type of Valentine

The plan was to create an organization project. But I don't feel much like organizing.

I'd rather get romantic-like and look ahead to Valentine's Day.

So I came up with a slew of simply made pins for every Valentine.


I've used a variety of Punchelements from Gypsy Soul Laser Cuts for the bases. (Only the round are currently listed on the site.) Not too long ago I scored a 1" round punch at the craft store so making these was super simple.

Paint the base, add sparkle, add image/sentiment, embellish and finish off with a pin back!


I've made them to suit just about every Valentine. There's pink and sparkly for the romantic.


And something glittery and red for the saucy types. There's a "Go Away" pin for those who would rather be left alone.


"I am crazy" for my buddy who says this is the reason she is single.


A number of the pins have images of Cupid and Psyche, a theme I think I might like to further explore some time.


A few of the pins are a little crass... but I like the way glitter and the indelicate work together.


Do you want to make your own? You can download a sheet of the saucy and silly, nice and naughty sentiments below. (Note: You may have to click for the full sized image.)


If you need a little more direction the video tutorial for creating these wee thing-a-ma-bobs can be found HERE.

Supplies:

Punchelements 1 inch Scalloped

Acrylic Paint
Glitter
Glue
Embellishments
Pin Backs


Now, prepare some sparkly Valentine's for the peeps you love!


Friday, November 04, 2016

A Timeless Grandfather Clock

This month for gslcuts.com I've created a 'timeless clock' with Gypsy Soul's Grandfather Clock.


I've used a pretty floral scrapbook paper to cover my clock. Just one sheet will do the trick. The little drawer at the bottom, and interior of the clock, have been lined with a page from an old, discarded book.


The top section of the clock does not contain a time piece (although you certainly could add one), instead being home to a nest of little eggs.


The top has been decorated with moss, flowers, an acorn and some wee mushrooms.


Inside, a butterfly garden, with moss, paper roses and pretty flying things.


This particular clock measures 11" tall. It's a nice with a goodly amount of space to play with inside for creating a little scene or diorama.

If you're interested in making your own, I have a video of the construction of this piece HERE.


And here is your supply list:

Grandfather Clock 11 Inch
(psst, there is also a smaller 1:12 scale version)


Sheet moss
Floral scrapbook paper
Paper Roses
Plastic Eggs
Flat back pearls
Twig Vine Garland
Red Mushrooms on Wires
English Fairy Garden Collage Sheet
Mini Floral Dresden Borders - Antique Gold
Narrow Gold Fleur Dresden Borders*