Friday, November 29, 2013

Family Friendly Matchbox Town with Tutorial

Graphic 45 asked me to create a family friendly beginner project, so I came up with this super cute little matchbox town. I've kept little fingers in mind for this project so that everyone can play along.


My son loves to create with match boxes. Their size is comfortable for little hands. One of these little buildings can be created quickly, a whole village created in an afternoon. It’s also a great group project, each person contributing a little building of their own. 

I create regularly with children and know how innovative and imaginative they can be. Use this tutorial as a guideline. Be sure to give little helpers assistance but let them do what they do best - create! If you’re a bit of a fuss pot (like me!) offer up items from one collection and everything will match fine and dandy.

Here is the supply list: 
Standard size matchboxes (without matches!)
Tacky Glue
Scor Tape
Black ink marker/pen
Ink pad


Graphic45_12DaysofChristmas_holiday_town_NBattilana_TUTE1of6


1. Gather all of your materials! Here I’m using paper, tags, stickers and banners from the Twelve Days of Christmas collection. 


Graphic45_12DaysofChristmas_holiday_town_NBattilana_TUTE2of6

 2. Choose the back ground colour of your building and cut a strip of paper the same height as your matchbox (mine was 2.1”) then wrap the paper around the outside sleeve of the matchbox and affix it into place. It’s a good idea to make the paper wider for younger children, to give them some wiggle room, then trim away the excess.


Graphic45_12DaysofChristmas_holiday_town_NBattilana_TUTE3of6


3. Select a piece from the bunting sheet for the door, ink the edges if you like, then push a small brad through to create a door knob. I sketched three small windows and cut them out, as well as three small rectangles for window sills. **If you are working with very small children you might consider preparing windows ahead of time so that they can focus on assembly.


Graphic45_12DaysofChristmas_holiday_town_NBattilana_TUTE4of6


 4. Glue the door and windows into place. I like to ink all of the edges. I think it makes the pieces ‘pop’ and adds to the sketchy charm of the pieces.


Graphic45_12DaysofChristmas_holiday_town_NBattilana_TUTE5of6
 

5. Add finishing touches like Dresden trims and stickers.


Graphic45_12DaysofChristmas_holiday_town_NBattilana_TUTE6of6


For variation stack boxes together, creating fatter buildings with bundles of two or more boxes. One lonely building isn’t very impressive so make a whole holiday village perfect for imaginative holiday play or hiding little sweets and charms inside.


Hop over to the Graphic 45 blog for more photos of this project and LOADS of other beautiful papery eye-candy.


Thursday, November 28, 2013

Grommet Holes

So let's say you don't have a large hole punch and you're not eager to purchase one. How do you work with the metal grommet hole on the Graphic 45 tags?

I'm sure there are loads of ways of dealing with them, but here is my technique.

Using the tag as a template I cut out my paper. This happens to be Turtle Doves from the 12 Days of Christmas collection.


Lining up my cutout with the tag, I press around the grommet hole to slightly emboss the area.

Holding the paper in place I take some sandpaper and lightly sand around the raised area. (Note: I just grabbed what was on hand to demonstrate, this sandpaper is very coarse so it's a bit scratchy).


Using that area as a guide, I cut a hole in my paper.


Now I affix the paper to the tag. I like to use rubber cement or tacky glue. The moisture of these adhesives gives the paper a tiny bit of 'give' which allows the paper to stretch slightly, so I can press the paper firmly into place. I run my nail around the edge to give a nice tight fit around the raised metal grommet.


When the adhesive is dry I run a blade around the edge of the grommet. NOTE: If your paper is wet or damp from the glue it is more likely to tear rather than cut.

Now I carefully cut away the excess paper.


And there you have a perfectly cut grommet hole!


For the back of the tag where the grommet is flatter, I sometimes just sand away the excess paper. Because I'm using very coarse sandpaper for this demo it's really scratchy! If you use a finer grit and some care, the results won't be nearly as messy.

Because I usually ink or grunge up my edges I actually don't mind if the reverse isn't absolutely perfect. A bit of paint or stain will camouflage those edges, and with a ribbon in place no one will even notice ;)

Hope that helps. Happy mess making!

Sugar Plum

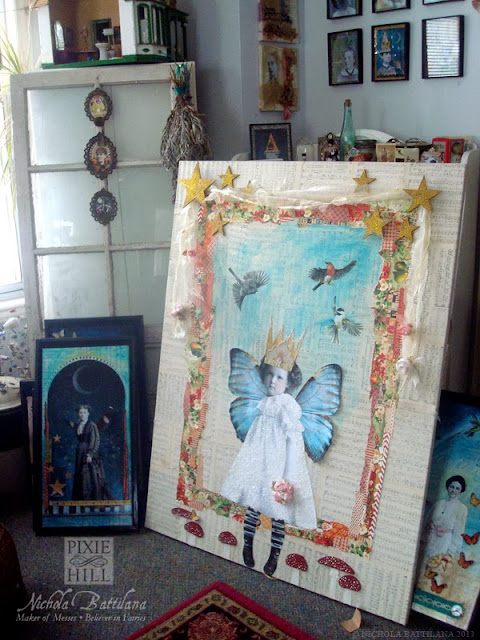
Cutting it VERY close, I've finished the final piece for my December show. Well, almost done, she might get a little extra somethin' somethin' today. ANYWAY here is my Sugar Plum Faerie.


She is not plum coloured but she is very sweet and sparkly. Here are a few of her details...


The canvas has been covered with vintage hymnal sheets. There are three painted birds on the piece: a European robin, a chickadee and a Junco. All are lovely little birds that remind me of winter.


There are several pinkish paper roses on the piece which I made from coffee filters.


Seven glittering stars dot hold up a gauze swag. The stars are corrugated cardboard. You can see here that 'frame' is created using scrapbook paper (mostly Graphic 45).


At the faeries feet there are some red spotted toadstools. There were made from an old book cover and scarps of canvas.

You can't really tell from the photos but the piece is quite glittery. I think it's a lot of fun and very sweet. It's also HUGE and the biggest piece I've ever done! Take a gander at the size of this gal...


That's 3' x 4' of Sugar Plum goodness.

If you happen to be near Cobourg tomorrow I'll be installing the show at Impresario in the evening. There's a VIP shopping event taking place downtown and there'll be lots to see and do if you're looking for something nice to do on a Friday night.

P.S. Happy Thanksgiving to my American friends! I hope your holidays are starting off just right, filled with loads of loveliness.

Wednesday, November 27, 2013

Good Morning: Winter wonderland!


There are definitely two types of people in this world. Those who wake up to a fresh blanket of snow and groan and those who see a wonderland. I am the latter of the two.


Winter seems to have arrived in one fell swoop at Pixie Hill. It's absolutely beautiful. Snow is precariously perched on every single branch. Even the birds have some shoveling to do.


My neighbours perfect tree!


Late last night the dog wanted to go out so I did get a little preview of this magic. It struck me, standing there in the dark, being snowed upon while the dog did his business, just how quiet the world was. Perhaps that's one of the reasons I love it snow too. Not only is it bright and beautiful, but it quiets the world. Lovely.

Tuesday, November 26, 2013

Papery Woodland Centrepiece


I created this papery centerpiece for my friends at Alpha Stamps. It's a great project that requires very little fiddling but is mighty impressive upon a festive table. AND I'm going to show you exactly how to make your own. Here's your material list:

Materials
Assorted Feathers

Step 1: Cover an upturned Layer Cake Paper Mache Box with some decorative scrapbooking paper. If using the large size box you'll need to use two strips to cover it. Using this vertically striped paper helps to hide the seam! 


Tip: I'm a bit of a stinker when it comes to measuring and trimming. To create perfect edges I cut slightly larger than necessary then gently sand my edges so that they appear to be cut perfectly.


Step 2: Add a strip of coordinating paper or ribbon around your base. I've used Scor-tape to adhere this, easy peasy.


Step 3: Taking several strips of Natural Raffia, wrap that around and tie in place with a nice little bow.


TIP: To keep your bow from slipping a tacky glue dot just behind the knot will keep everything in it's place.

Step 4: Apply a healthy layer of Sheet Moss to the top of the box. I use hot glue to keep it in place. Don't be stingy, and make sure the moss reaches all the way to the edge.


The base is now complete! Woo hoo!

Step 5: Now we're going to paint some Oak and Maple Leaf Die-Cut Chipboard cutouts. These ones are quite thick and sturdy and take layers of paint really well. I've used 3 different shades of green acrylic paint. I dampened the leaves, then sort of mottled the colours together using a rag and my fingers (because I don't mind getting messy). Be certain to apply paint to both sides and don't miss the edges!


Step 6: Once dried, begin layering and fanning the leaves. I've used hot glue to apply them.

 Keep playing and arranging until you end up with a sort of tree shape like this...


Step 7: Dig a small hole in your mossy landscape, fill it with a healthy dose of hot glue and hold your tree in place. It should remain upright when you release. If not, don't panic. Just apply some additional moss around the bottom of the tree with some hot glue and hold in place until dry (this should only take a minute or so).


TIP: When placing your tree, keep in mind where your bow is placed. You'll probably want a flat side of the tree to line up with the bow.

Step 8: Working in layers, add your embellishments! I've used all sorts of things such as: Miniature Pine Cones, Pumpkin Pods, Embossed Fall Leaves, and  Red Glittered Holly Berries.


TIP: If your tree is a little wobbly, your embellishments can help to add stability.

TIP #2: You can get rid of all those stringy hot glue bits by blowing a hot hair dryer over them.


And that is it! You're done! Hurrah for you! Well done :)

P.S. After you've enjoyed your fall centerpiece, if you're feeling a little more wintery, transform it into a Christmas tree! Add some glittery snow and and cute little charms and decorations... voila and ho! ho! ho!

xoxo enjoy

Terrifyingly terrible joke card and tag envelope

I made this card and envelope duo when the kidlets were returning to school. Now, some kids love school... mine does not. To brighten his gloomy weekdays I sometimes put a terrible joke in his lunchbox. I’ve always just scribbled something on a post-it note but I decided that this year I might pull up my fancy pants and create a proper means of delivering those bits of hilarity.
  
So I created a sturdy envelope from a Graphic 45 Staples Large Tag Album along with a little card. It might seem a little strange to make a back to school card with the Steampunk Spells collection but what 10 year old boy doesn’t think returning to the desk is dreadful and truly horrific?

Want to create your own? Hop over to today's Graphic 45 blog post for a tutorial!

Here is the full supply list:
Steampunk Spells:
Graphic 45 Staples: Large Tag Album
May Arts Ribbon
Button
Sandpaper
Ink pad

Friday, November 22, 2013

Gooood Morning: It's all how you look at it


Sometimes I feel a lot like this raindrop.

Some may see it as representive of 'just hanging on' or something sad like a tear, or dreariness. That's not what I see at all.

I see the whole world reflected in a tiny drop of water. A seemingly impossible riddle solved with a drop.

Sometimes I feel a lot like this raindrop. Like I am one small thing, but inside a whole upside-down world exists.