Saturday, September 30, 2017

Halloween Hotrods with Tutorial

One of my very favourite projects from last year were the Mad Max hot rods built with my buddy Paula Mould. It's one of those projects that is just so much messy fun. I mean you COULD be neat and proper and make something stunning... or you can let loose and just glue crap to other crap and have a grand old time doing it.

Halloween Hotrods: Dollarstore project with video tute • Nichola Battilana

There's Halloween junk all over the Dollarstore aisles and it made me nostalgic and inspired to revisit that project. This time with a video tute (see below) for you to make your own monster machines.

Since this is a dollarstore, stash busting project, it's not going to break the bank.

Halloween Hotrods: Dollarstore project with video tute • Nichola Battilana

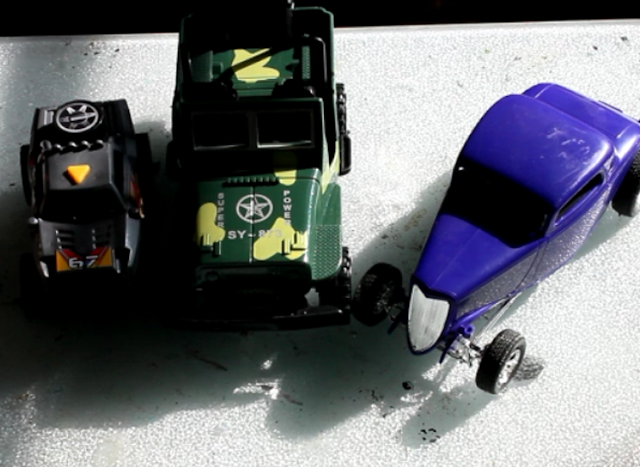
We're starting out with simple plastic toy cars and trucks.

Halloween Hotrods: Dollarstore project with video tute • Nichola Battilana

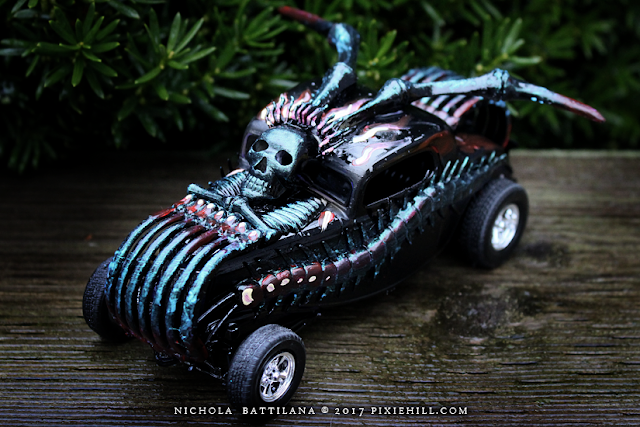
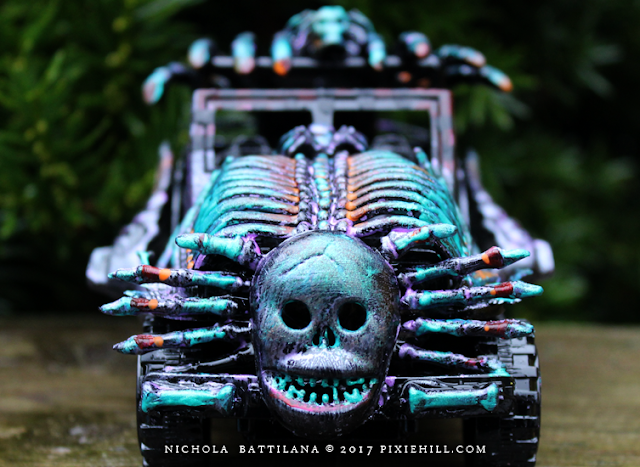
Embellishing the heck out of them. Giving them a knock out paint job. And ending up with something like this...

Halloween Hotrods: Dollarstore project with video tute • Nichola Battilana

They check off most of the boxes for a kid friendly project. They're cheap, fun, neatness isn't exactly a factor. You WILL need to supervise/modify the project depending on age appropriateness (i.e. glue guns are the devil) but it's do-able for and little hotrodders you know.

Halloween Hotrods: Dollarstore project with video tute • Nichola Battilana

I've just used my trusty old hot glue gun for this project. If you want something that can be handled (crashed? raced?) and remain somewhat intact, you'll need to invest/experiment with a better method of adhesion. Or, you know, let them be the $3 works of art they are and just enjoy the destruction.

Halloween Hotrods: Dollarstore project with video tute • Nichola Battilana

Here's your supply list:

Toy cars: trucks, busses, boats, planes... whatever strikes your fancy!
Halloween swag: skeletons, bugs, beads, bones, skulls, spiders, bats
Black spray paint: I used gloss in the tute... I MUCH prefer flat/matte

Acrylic paint: I mostly used a product from Colourarte called Silks Acrylic Glaze It has a nice pearlescent finish and it was in my stash. Metalics looks super cool.
Paint brush
Sponge brush
(for blending)
GLUE: I used hot glue because it's fast and easy. Do what works for you!
Cutting tools: for chopping up spiders and plastic skeletons
Tape: for covering any bits you don't want spray painted

Halloween Hotrods: Dollarstore project with video tute • Nichola Battilana

That's it weirdos! Go make something hotroddy!

Here's how to put them together.

Friday, September 29, 2017

Spooky Wee Houses

Halloween is just around the corner so I thought that this month I'd make something spooky for that sweet holiday. Using products from Gypsy Soul Laser Cuts,  Canvas Corp and 7Gypsies.


I've used the Cabana Row Houses as my base. There's 5 in the set and so you can create quite a nice little haunted neighbourhood!


Some of the houses are covered using papers from 7Gypsies. Some are simply painted white, decorated with Architextures™ Parchment Rub-Ons and then distressed.


Each of the houses uses pieces from the Miniature Bookplates Shape Set as windows. Creating the rooves was super simple with burlap pieces from Canvas Corp


There are plenty of embellishment opportunites. I've used Faux Metal Number Plates 1 to 25 but don't forget the larger Faux Metal Number Plates and Gears Shape Set would be super cool for a steampunk haunted neighbourhood. Go check out all the shapes available at Gypsy Soul and I'm sure you'll find some inspiration.

For a final touch I've added plastic spider and ants from the halloween aisle at the dollar store. 

Want to make your own? I've created a walk through with some simple practical tips HERE

And here are the goods I used in making my own little spooky neighbourhood.
7Gypsies Paper
Architextures™ Parchment Rub-Ons
Burlap from Canvas Corp
Plastic spiders
Vintage images
Twine/Ribbon
Acrylic Paint
Hot Glue
White Glue

Saturday, September 23, 2017

Coffin Shrines and Tags

OMG IT'S ALMOST HALLOWEEN!


I was pleased to find a Half Scale Coffin with Lid in my AlphaStamps design kit this month. I actually had a few 4 Inch Coffin Boxes on hand already, but this smaller version poked me in the ribs and prompted me to finish up all those bits and pieces.


I am totally for making materials stretch and using every bit and bob. So I decided to use the box part of these coffins as a sort of shrine, and the lids as chunky tags. Two projects, one product. This also means no fiddling or fuss to ensure the top fits perfectly with the bottom. Huzzah!


For the shines... just embellish the exterior, fill with tulle, add a little dude like this guy from Little Darlings Collage Sheet and gussy him up with some dodads from the Halloween Dress Up Half Sheet.


A small bit of moss tucked into the bottom will help your wee person stand sturdy.


The tags are super simple too. Assemble, cover exterior, add some trim and some cute Halloweeny images from Halloween Clock Spinners Collage Sheet. Attach a little loop of ribbon and you're ready to go!

I've got a super duper fast video of the assembly of the tag on the far left above if any of that isn't clear.


Here's the list of goodies I used for making these cute Halloweeny dodads.

Half Scale Coffin with Lid
4 Inch Coffin Boxes
1/2 Inch Loop Braid - Black
4mm Orange and Black Button Mix
Acrylic Black Bat Cut-Outs*
Black and Orange Mini Gingham Check Ribbon
Halloween Clock Spinners Collage Sheet
Halloween Dress Up Half Sheet
Little Darlings Collage Sheet
Little Ghouls Kit - September 2017
Little Imps Collage Sheet
Transatlantic Travel 6x6 Paper Pad

And here is eveything in one spot for your convience.

*That skully guy tag uses Rare Oddities from Graphic 45

Tuesday, August 29, 2017

Magic House Box Shrine with Tutorial

Small things are often jam packed with magic. Take buttons for example. I am 100% certain that buttons contain infinite amounts of magic. How many of us have memories of grandma's button tin? There simply MUST be magic in those little wonders.


This month I've used Gypsy Soul's Mini House Room Box to create a space to celebrate these small bits of magic. A place to tuck away thimbles and stones and buttons, all those precious tiny things that hold big memories.


There's LOADS of room for personalisation with this project. 


My Faux Typewriter Keys spell out MAGIC but you could order keys to spell out a name create a personalized memory shrine or choose to spell out a word that is particularly sentimental to you and really make this project your own.


I've put some tiny feet on my shrine but you could easily add hanging hardware to the back, or a length of ribbon or twine for hanging.


And check out the roof detail! If you make mini houses the Chipboard Shingles are a lot of fun to play with.

The assembly for this piece is super simple, but just in case you'd like to see how I put it together, **HERE** is a video walk through to guide you.

Products used in this piece:
Chipboard Shingles - Half Scale Sampler
Mini House Room Box 4 Cubbies
Faux Typewriter Keys Gold
Victorian Corners 1
Winged Heart**
Scrapbook paper
Acrylic Paint
White and Instant glue
Small treasures!

Saturday, August 19, 2017

The Daystars

This months AlphaStamps kit is "Cards & Constellations" Rather than a 'wish-upon-a-star' goodie goodie piece, I was smitten with these devilish fellows.


They reminded me that the translation of Lucifer is 'Daystar', and seemed to fit this months theme.


'Daystar' is also another name for the planet Venus. It is called the daystar/morning star/evening star because it is often the first bright star in the sky during twilight, and the last at dawn.

I'd like to imagine that these plucky little night devils would conspire, and try to plot a way to continue to shine after the sun rose. That they would want to be 'Daystars'.


As darkness always is... they would fail, overcome by light, and defeated by the brilliance of the sun.


But I'm sure these tenacious fellows would try again and again despite the odds stacked against their success.

Notes on making:
I kept this project super simple. I just covered the cards in scrapbook paper and used a stamp and gold embossing powered to add a smidge of interest. Then, fussy cut elements and add the top frame (which I painted prior to gluing into place).

Materials:
El Diablo Cards Collage Sheet
Double Dot Vintage Dark Denim Blue Scrapbook Paper
Large Blue Mosaic Scrapbook Paper
(used on reverse)
Stars Playing Card
Gold embossing powder
Patterned stamp
Acrylic paints


Thursday, August 17, 2017

Summer Adventure: Camping

 Last week we went camping at Bonnechere Provincial Park.


Our site was right on the waters edge.


We could simply push our canoe into the river and be on our way!


The kid took his kayak and yakked all over the place!


We could sit by the waters edge lazily casting for fish... then setting them free and eating burgers instead.


After the rain, when the fog spread over the water, it was particularly lovely.


The beach was quite nice. After a certain hour, when it was time for tired children to be fed, it was desolate and it felt like we had the whole lake to ourselves.


This fellow did sneak up on me while I was fishing with my feet in the water. I nearly jumped out of my skin when I saw him no more than two feet from my precious toes. He hung around the came and I nicknamed him Boop because he kept sticking his nose out of the water and I had an overwhelming urge to boop him on it.


Finally, a totally unflattering and utterly ridiculous photo of yours truly. It's terrible but I kind of love it at the same time, just like camping. It's messy and aggravating and far from perfect... but that doesn't mean it isn't fun and beautiful.


Wednesday, August 16, 2017

Summer Adventure: Meh

I'm clumping two adventure locations into one post today. 

First, the Canadian Museum of History (formerly the Museum of Civilization). I've been here several times and it was always one of my favourite stops... so I'm sad to say this time was a disappointment. 


There were amazing and inspiring works in the First Peoples and Grand Hall.


It would have been so nice to have more information about the work presented. I mean look at this guy! I want to know about him and understand him... not just gawk at it because it's a cool object.


It was beautiful and really interesting to look at. 


But I would have loved to know the story behind this tiny dude.


Or this eye on the ceiling! 

Some items were very well documented, but if you're going to present us with 300 giant spoons it would be nice to know their purpose and importance so they could be truly appreciated.


There is some astoundingly beautiful and interesting work at the National Gallery. Just look at this Van Gogh!


And there are walls and walls of gorgeous classical and contemporary work.


There were giant paintings with perfect brushstrokes. Seemingly impossible images created in the 1600's. However, many of the masters works appeared... second rate? Big names with imperfect pieces that lacked life and vibrancy as though they had been sun faded. Not all Picasso's and Degas' are perfection and it's sort of like finding out your parents are flawed when you see proof of it.


On the plus side... look at this adorable baby JC who sort of reminds me of a Sea Monkey.


And this amazing work (above) by Canadian artist Jack Chambers called Messengers Juggling Seeds.


I love galleries and museums but it was hot and stuffy and there was an incredible amount of security in the gallery the day we visited. So much as to detract from the experience. My companions claimed they were following me! Ha! Sorry security peeps, while following me someone else is probably licking the Klimt


**Bonus Hieronymus Bosch because of the butt trumpeting