Thursday, August 25, 2016

Rain, toadstools and a WIP

We've had a spot of rain here and the lawn is becoming green and lush once again. Good thing too because the crispy crunchy brown expanse was not doing a thing for me. All the rain has also brought our faeires out of hiding. They've been dancing across through the garden and leaving toadstools in their footsteps.


The one below is called an Earthstar. They are some of my favourites. From wikipedia "The Blackfoot of North America called the fungus "fallen stars", considering them to be stars fallen to the earth during supernatural events" I love seeing them sprout each year near the tire swing, and am always certain they are an omen of something good.


Even the old mushy things are lovely in their own way.


Despite my lack of posts I have been working. Lately I find myself prepping items and then becoming stumped. There's a log jam of ideas trying to get out... but not a heck of a lot is flowing through. That said, this appeared on my table yesterday....


Which got a slap of paint and turned into this last night...


And I *think* I know what it is, but we'll see where the making takes me today.

Hope you're feeling beautiful today...  because you are. Truly.


Wednesday, August 24, 2016

Industrial Chipboard Lantern Assembly

Katie asked for some help assembling these lanterns...


... and I am happy to help!


Good luck Katie!

Tuesday, August 23, 2016

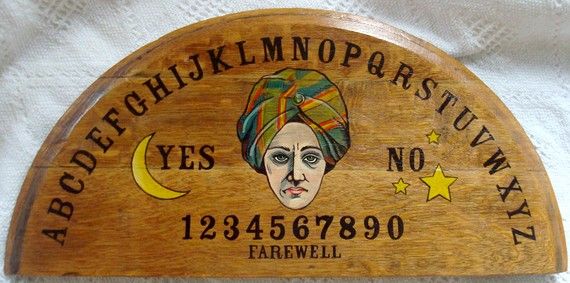
Mystic Swami Board Revisited

YEARS ago I made this 'Mystic Swami Spirit Board'.

Mystic Swami Spirit Board - Nichola Battilana

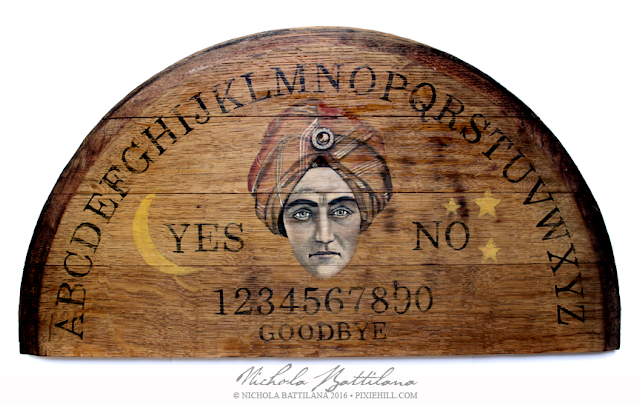
Recently someone inquired about it, and since I'm on a Halloweeny kick, and since the idea peaked my fancy, I decided to revisit the project.

Mystic Swami Spirit Board - Nichola Battilana

Look what few years of farting around with art and craft supplies can do! What a difference! I'm tempted to paint one of these every year to mark the improvement in my skills.

Mystic Swami Spirit Board - Nichola Battilana

He's looking a little pasty in this pic... let's just ignore that okay.

Mystic Swami Spirit Board - Nichola Battilana

Just like the original it's painted upon one half of a used wine barrel lid. Made with 1" thick oak staves, and measuring 22" wide, it's a hefty thing. 

Mystic Swami Spirit Board - Nichola Battilana

And I KNOW that some people have strong opinions about Ouiji and spirit boards so let me just say this: this is used wood with letters painted upon it. Glue guns on the other hand, now those things are pure evil.


Saturday, August 20, 2016

A pretty great day.

Today was a pretty great day. 


Soccer finals and my kids team came in 4th or 5th. No idea really. 
He scored four goals and did his best. We're proud of that ding-a-ling.


My hubs tried not to laugh at my jokes. But I'm hysterical so he was helpless!


My friend came for a visit and was receptive to my ridiculous gift.


There was laughter before dinner even started.


And though we tackled some heavy topics,
we manged to smile even more into the night.

Hope you're smiling too.

Saturday, August 13, 2016

Wee Chippy Lanterns

AlphaStamps.com has some new chipboard Industrial Lanterns. They're really kinda cute, like small railroad lanterns, but of course I've filled mine with dragons and fairies ;)


Each side of the lanterns has an 'X' across it, but it's easily chopped off if you want to show off a miniature dragon or fairy silhouette. 


I've added some dresden trims to mine to fancy them up, along with some floral elements like Mini Fern Garland and Black Mini Paper Blooms. Paint and embellish those suckers to suit your tastes.


The 'glass' in these is the Clear Window Inserts with some tissue glued to the back and chopped to size. You can cover all four sides of a lantern with one sheet cut into quarters. I've also added a thin coat of white paint to the exterior here. It helps to hide the cutout when the lights are off, but you can still make them out when lit.

If those dragons are causing trouble (as dragons are wont to do) you can just bend those wings and tails to fit. Actually, those bent wings add a bit of dimension to the shadows.


And if you're itching to hang those lanterns, there are convienient holes in the removable lids. My reccomendation? Pop in a light, line up those holes and use a little bamboo skewar to hold them in place while you hang them via a Fluted Ring Pull glued to the top. 


OR you might just thread twine or ribbon through the holes to hold those pieces together with enough extra length that can be used for hanging too.


Whatever your fancy, here are the supplies I used to create these pieces to get you started: Everything in one place


Saturday, August 06, 2016

A Little Burrow

July's kit for Alpha Stamps was the Vintage Beach Cabanas. And although I'm not a beachy sort, I did manage to make those Cabanas work for me. I made a little burrow.


This isn't exactly the Weasley abode (it's far too tidy and not nearly wonky enough) but it is inspired by the home of my favourite magical family.

Now, I don't have a full tute, but I will give you a few pointers if you'd like to make something similar. 

I simply took the Cabana Row House Set and stacked the wee buildings together, chopping out any bits that were in the way, to make everything fit neatly.


The roofing tiles, although applied in rows, are totally wonky. I think it's kind of charming though... neatness isn't everything after all. You'll also notice here a little Thin Fleur Dresden Borders around the edge and peaks of the roof which I think add a nice touch. And there are people peeking through the windows from the Seaside Victorian Children Collage Sheet


If you look on the bottom left here you'll see some Wooden Spreaders. They don't actually hold anything in place (yay hot glue!) but they make sense visually. You can absolutely cheat when it comes to miniature construction. Build the impossible! BUT adding little details like fake supports and whatnot adds a smidge of 'reality' to your nonsense.


That bent chimney is a bendy straw painted black. If you happen to be out and about and see a box of those things on the cheap, buy them. They are super handy for making chimneys and pipes in miniature work. The rooftop chimneys include Black Umbrella Bead Cap which I think adds a nice little detail. 


Don't forget the back and sides of your piece. They are easy places to overlook but, if possible, worth fleshing out. It's always a pleasant surprise to see that an artist or maker has take the care to consider every viewpoint.


This little project was a lot of fun, so much so that I'm thinking I might make a second proper Weasley Burrow to be it's neighbour!.

Here are all the bits used in this project in one place.

Or the individual parts:
Cabana Row House Set
1-1/2 Inch Wooden Spreaders
1-7/8 Inch Wooden Spreaders
Seaside Victorian Children Collage Sheet
French Riviera 8x8 Paper Pad
Seaside Doors & Windows Set
Thin Fleur Dresden Borders - Black
Tim Holtz Long Mini Brads
Black Umbrella Bead Cap
Tiny Black Hinge Set
Flower Soft - Vintage Christmas
Box Feet
Bendy Straw
Acrylic paint
Glue
Wood Stir Sticks (door)

Friday, August 05, 2016

Indoor Fairy Garden Tutorial

It's the first Friday of the month so that means a project for Gypsy Soul Laser Cuts and a brand new TUTORIAL! This month I'm showing off how to make this little indoor fairy garden.


This sweet little cobble stoned garden uses Gypsy Soul's Cottage Base and measures just 9" square. It's a nice size to work on because you can put a lot of detail in that little space, but it's not an overwhelming size to fill or display.


One of the very nice things about this project is that you can absolutely personalize it to make it your own. I've chosen Gypsy Soul's 1:24 scale arbor and Tiny Birdhouse as accessories, but don't let that limit your choices! There are loads of possibilities and you should absolutely make your wee garden to suit your own tastes.


In my example I've used the Cobblestone texture sheet to create the garden path. Again, don't feel limited by my choice. There are loads of interesting texture sheets to choose from, as well as a brick wall sheet that would be ideal.


So, start collecting little garden bits and bobs, teeny flowers and twigs, and let's make an indoor fairy garden!


Cottage Base1:24 scale arbor
Tiny Birdhouse

Cobblestone
Acrylic gel medium
Acrylic paint
Tea and coffee grinds
Sheet moss
Twigs and sticks
Little faux flowers, leaves
Misc. accessories