Showing posts with label design team. Show all posts

Saturday, August 13, 2016

Wee Chippy Lanterns

AlphaStamps.com has some new chipboard Industrial Lanterns. They're really kinda cute, like small railroad lanterns, but of course I've filled mine with dragons and fairies ;)


Each side of the lanterns has an 'X' across it, but it's easily chopped off if you want to show off a miniature dragon or fairy silhouette. 


I've added some dresden trims to mine to fancy them up, along with some floral elements like Mini Fern Garland and Black Mini Paper Blooms. Paint and embellish those suckers to suit your tastes.


The 'glass' in these is the Clear Window Inserts with some tissue glued to the back and chopped to size. You can cover all four sides of a lantern with one sheet cut into quarters. I've also added a thin coat of white paint to the exterior here. It helps to hide the cutout when the lights are off, but you can still make them out when lit.

If those dragons are causing trouble (as dragons are wont to do) you can just bend those wings and tails to fit. Actually, those bent wings add a bit of dimension to the shadows.


And if you're itching to hang those lanterns, there are convienient holes in the removable lids. My reccomendation? Pop in a light, line up those holes and use a little bamboo skewar to hold them in place while you hang them via a Fluted Ring Pull glued to the top. 


OR you might just thread twine or ribbon through the holes to hold those pieces together with enough extra length that can be used for hanging too.


Whatever your fancy, here are the supplies I used to create these pieces to get you started: Everything in one place


Saturday, August 06, 2016

A Little Burrow

July's kit for Alpha Stamps was the Vintage Beach Cabanas. And although I'm not a beachy sort, I did manage to make those Cabanas work for me. I made a little burrow.


This isn't exactly the Weasley abode (it's far too tidy and not nearly wonky enough) but it is inspired by the home of my favourite magical family.

Now, I don't have a full tute, but I will give you a few pointers if you'd like to make something similar. 

I simply took the Cabana Row House Set and stacked the wee buildings together, chopping out any bits that were in the way, to make everything fit neatly.


The roofing tiles, although applied in rows, are totally wonky. I think it's kind of charming though... neatness isn't everything after all. You'll also notice here a little Thin Fleur Dresden Borders around the edge and peaks of the roof which I think add a nice touch. And there are people peeking through the windows from the Seaside Victorian Children Collage Sheet


If you look on the bottom left here you'll see some Wooden Spreaders. They don't actually hold anything in place (yay hot glue!) but they make sense visually. You can absolutely cheat when it comes to miniature construction. Build the impossible! BUT adding little details like fake supports and whatnot adds a smidge of 'reality' to your nonsense.


That bent chimney is a bendy straw painted black. If you happen to be out and about and see a box of those things on the cheap, buy them. They are super handy for making chimneys and pipes in miniature work. The rooftop chimneys include Black Umbrella Bead Cap which I think adds a nice little detail. 


Don't forget the back and sides of your piece. They are easy places to overlook but, if possible, worth fleshing out. It's always a pleasant surprise to see that an artist or maker has take the care to consider every viewpoint.


This little project was a lot of fun, so much so that I'm thinking I might make a second proper Weasley Burrow to be it's neighbour!.
Here are all the bits used in this project in one place.

Or the individual parts:
Cabana Row House Set
1-1/2 Inch Wooden Spreaders
1-7/8 Inch Wooden Spreaders
Seaside Victorian Children Collage Sheet
French Riviera 8x8 Paper Pad
Seaside Doors & Windows Set
Thin Fleur Dresden Borders - Black
Tim Holtz Long Mini Brads
Black Umbrella Bead Cap
Tiny Black Hinge Set
Flower Soft - Vintage Christmas
Box Feet
Bendy Straw
Acrylic paint
Glue
Wood Stir Sticks (door)

Friday, August 05, 2016

Indoor Fairy Garden Tutorial

It's the first Friday of the month so that means a project for Gypsy Soul Laser Cuts and a brand new TUTORIAL! This month I'm showing off how to make this little indoor fairy garden.


This sweet little cobble stoned garden uses Gypsy Soul's Cottage Base and measures just 9" square. It's a nice size to work on because you can put a lot of detail in that little space, but it's not an overwhelming size to fill or display.


One of the very nice things about this project is that you can absolutely personalize it to make it your own. I've chosen Gypsy Soul's 1:24 scale arbor and Tiny Birdhouse as accessories, but don't let that limit your choices! There are loads of possibilities and you should absolutely make your wee garden to suit your own tastes.


In my example I've used the Cobblestone texture sheet to create the garden path. Again, don't feel limited by my choice. There are loads of interesting texture sheets to choose from, as well as a brick wall sheet that would be ideal.


So, start collecting little garden bits and bobs, teeny flowers and twigs, and let's make an indoor fairy garden!


Cottage Base1:24 scale arbor
Tiny Birdhouse

Cobblestone
Acrylic gel medium
Acrylic paint
Tea and coffee grinds
Sheet moss
Twigs and sticks
Little faux flowers, leaves
Misc. accessories

Wednesday, May 11, 2016

Alice's Altoid Manor House

This month's Alpha Stamps kit is *drumroll* Alice in an Altoids Tin!

I'm really excited to share this particular tin, which I've named Alice's Altoid Manor House, because it's actually quite simple to put together.


I simply applied the Altoids Tin Book Covers to the front and back of the tin. I didn't even bother with the book spine (though I'm sure it'll come in handy for something). Then a Window Pediment - Federal was added to the front top edge and the Window Pediment - Yorktown to the bottom front edge. A snip of Thin Fleur Dresden Border is applied under the top pediment, then whole shebang is painted grey.


The windows are just little paper frames I cut out. I placed some Alice charaters from the Wonderland Rabbits and Hares Collage Sheet in the squares and added a layer of Diamond Glaze to make the 'windows' glossy. The door is framed with some snippets of wood and topped with little bit of filagree that broke off something-or-other that I kept for just such an occasion. Finally I finished the exterior with a Bronze Stopwatch Clock Charm and some Flower Soft.

I've kept the inside fairly simple too.


On the shallow tin lid I just placed an image from the Alice Covers Collage Sheet adjusting the size to fit. Tip: If you want your book/house/tin to close tightly, you'll want to avoid adding much thickness to this part of the tin, especially around the edges.

Finally, the fat portion of the tin. I've taken an image from the Alice Herself Collage Sheet (printed slightly larger to fit the tin) and cut out each of the elements, layering them in a simple paper tole style. The last touch, a little cake made of paper clay and a glass bead 'drink me' bottle.

So now it looks as though I've written a darned novel, but I promise, this was a practically painless project! Sure the sides aren't covered... but the tin opens and I didn't have a meltdown attempting to apply hinges. (I often have hinge related meltdowns.)

Here is your supply round up:
Altoids Tin Book Covers
Blank Altoids Tins
Window Pediment - Federal
Window Pediment - Yorktown
Bronze Stopwatch Clock Charm
Mini Silicone Cake Mold Set
Thin Fleur Dresden Borders - Turquoise
Flower Soft - Peony Pink
Flower Soft - Meadow Green
Creative Paperclay*

Monday, May 09, 2016

Prima's Design Team Call 2016 -2017


Seeing loads of entries for the Prima Marketing design team call from fellow crafters I adore, I thought 'What the heck!' and decided to show off some of my projects made with Prima pretties.


Paper Caravan


Happy papercrafting!

Wednesday, January 27, 2016

A Petite Pink Villa for Alpha Stamps

This month's Alpha Stamps kit theme is Amour (Valentine Paper Theatres). I got totally sidetracked with their new itty bitty furniture and instead of a theatre created a petite pink villa, a sort of miniature romantic getaway.


A Frame Front Room Box is used as the base of this piece. Holes have been cut into the sides and back and laser cut window frames added. The addition of a Shadowbox Facade to the top of the box adds some nice visual interest.


For the exterior I first covered the piece in paper, then, using the Stone Wall Chipboard Texture Sheet I applied random patches of acrylic gel medium. I painted the entire piece, then added wash of darker paint allowed to pool in the crevices giving a good impression stonework without covering the entire piece.

Inside, a sweet little scenario of shared tea, crumbs and honey.


The table and chairs, and china cabinet are made of chipboard, 1:24 scale, and assemble quite easily. I've kept them simple with a coat of paint and a snip of paper, but I'm certain with a bit of ingenuity they would provide a solid base if you wanted to be a bit more elaborate. Tiny cushions on those seats would be absolutely darling. 

You'll find a long list of all the bits included in this piece below... but can we talk about that Green Pumpkin Teapot for a second?! There are a number of those little veggie/fruit teapots at Alpha Stamps and I think they are freaking adorable.


Grab a tiny book from the bookcase and let's head up the wee ladder.

This little loft is cute as buttons. It's so cute my camera is jealous and refusing to show just how sweet it is. (What a jerk.) ANYWAY... there's a little bed for getting cosy, maybe reading a book, maybe do a bit of romantical snuggling *wink wink*, or just for having sweet dreams. And let's not forget that Gold Candleholder to read by (which is really, really nice quality btw).


The pink bunting, flowers, curtains and ribbons may be a bit dramatic... but if you're going on a romantic getaway isn't that exactly what you want? What I wouldn't give for a weekend in a private pink villa, sipping tea, eating sweets, reading, and snuggling by candlelight. *dreamy sigh*


See something you like? Here's a link to all of the goodies I've used.

Alternatively, here is a big fat list of the individual supplies used:

Amour (Valentine Paper Theatres)
Frame Front Room Box 
Theatre Francais Shadowbox Facade
Acorn Caps*
Mini Silicone Bread Mold Set - Smaller Loaves
Mini Silicone Bread Mold Set - Larger Loaves
Mini Silicone Cake Mold Set
Creative Paperclay*
Silicone Mold - Architectural Flourishes*
Thin Looped Dresden Borders - Black
Mini Floral Dresden Borders - Antique Gold
1/2 Inch Bright Pink Paper Roses*
Sheet Moss*
Set of Unlabelled Jars, Bottles & Tins
Gold Candleholders
Old Fashioned Grocery Cans
Mini Red Shadowbox
Miniature Potted Plant in Basket
Small Wooden Spools
Wood Mini Spools
Green Pumpkin Teapot
Miniature Silverware - Set of 20
White Plastic Salad Plates
Little Household Goods Collage Sheet
Old Fashioned Grocery Rectangular Tins
Plastic white teacups
Round Table & 2 Chairs
1:24 Cupboard Hutch/China Cabinet
1:24 Chipboard Bed
1:24 Book Case
Chipboard Windows


Friday, December 18, 2015

Frosty Winter Fairy Dress for Tresors de Luxe

I'm excited to share a lacy project for Tresors de Luxe with you. Today, a frosty winter fairy dress.

I drafted a simple dress form from paper for this piece and added sheer fabrics and lace. Tucked beneath the front layer the edging is trimmed with this 1" Ivory Lace Trim, and the top layer of organza is edged with this 3" Ivory Lace Trim


The bodice was created with pieces from this White Lace Trim and Gold Lace Applique. The parts of the deconstructed gold applique have been used on the skirting of the frock.


Some pretty little flowers, acrylic snowflakes and set of fairy wings complete this piece and really add an extra dash of magic to this charming little lacy frock.

Materials used:
White Lace Trim
Gold Lace Applique
1" Ivory Lace Trim
3" Ivory Lace Trim

Sheer Organza
Small Faux flowers
Scrapbook Paper
Acrylic Snowflakes
Glitter
Fairy Wings printed on transparency sheet

Wednesday, August 12, 2015

A Poison Tin for Alpha Stamps

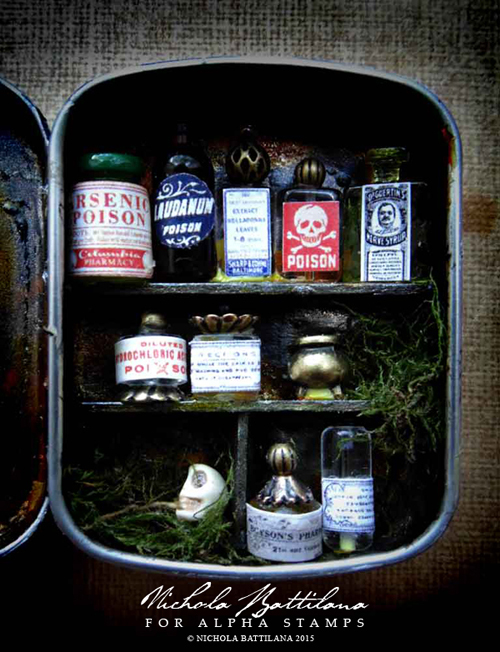
After months of airy fairy crafting it was a delightfully creepy surprise to get some spooky goodies from Alpha Stamps. And so, I'd like to present, a perfectly peculiar poison tin. 

 Poison Tin - Nichola Battilana


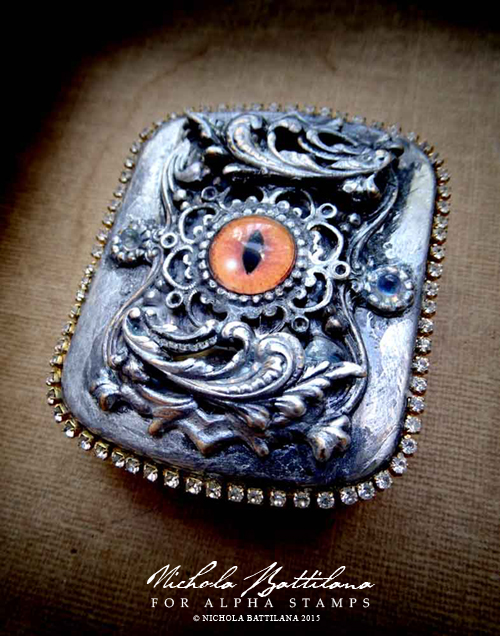
I've used supplies from the Magic Potions Kit and a few other bits and bobs. (The supply list can be found at the end of this post.) You'll notice that the front of the wee tin is lovely and ornate. I've achieved this look by layering Brass Feathery Scroll Filigree*,  some Flower Washers, and a few bezels... none of which were the same colour!


Poison Tin - Nichola Battilana

(Isn't that eye brilliant?! It's a 12mm Glass Cat Eye.)

Want to create a similar effect? Here's the process I used...

• Gather some flourished elements and start layering them, building a composition. Don't worry if their colour doesn't match... we'll help them to get along.

• Glue all of your pieces to the surface of the tin and allow to set. 


• Paint with a base coat of black paint. **Hint: multiple thin layers, given time to dry between coats, will work much better than a single thick layer of paint and preserves the details of the pieces.**

• Apply some silver acrylic paint. You may want to gently sponge off any excess.


• Apply a wash of dark paint to tone down the silver, allow it to pool in the crevices giving an aged look.


• With your finger, rub a little fresh silver paint to the highest areas.

The finished effect should allow you to combine different coloured elements to create piece that looks cohesive.

Let's take a look inside now...

Poison Tin - Nichola Battilana

Teeny tiny poison bottles! 

I do have a sneaky trick to share to save you some aggravation with those shelves. Instead installing the shelf then fiddling around to fill it in that small space, consider gluing the little bottles to the shelf first. Once dried, use the back surface of the bottles to glue into place rather than the small edge of the shelf. If using this method, be sure to consider the depth and height of the space you are filling.

Poison Tin - Nichola Battilana

And if you're itching for a supply list...

Magic Potions Kit
Brass Feathery Scroll Filigree*
Flower Washers
12mm Glass Cat Eye
Round Antique Bronze Filigree*
40x30mm Halloween Poison Cameo* 
Sheet Moss* 
E-6000 Adhesive*
Acrylic Paint

And a quick link to all the products used.

Tuesday, July 07, 2015

Adorable Floral Cake Topper for Petaloo

I was asked to create a wedding themed something for Petaloo. You can now add cake topper to your DIY wedding list. 
Adorable Petaloo Cake Topper - Nichola Battilana

I've used pink burlap flowers and daisy layers to top this cake while imagining a sweet, simple backyard wedding. But if your 'I do's' are a little more fancy, you could absolutely consider Botanica blooms atop a prettily iced cake, or vintage velvet blossoms for a shabby chic wedding.
Adorable Petaloo Cake Topper - Nichola Battilana

To create my topper I simply cut out thick decorative paper and affixed a mound of florists foam/oasis to the top. I added coordinating trim to hide the bottom edge, then simply applied the flowers to the foam. I printed the sentiment on thick card, applied a painted bamboo skewer and pushed into place. If you're worried about your topper moving, simply push toothpicks in the bottom to hold your piece in place.
Card Stock
Oasis
Bamboo Skewer
Butterflies