I've started this blog post a million times. Trying to come up with a good explanation, a reason for this project. The truth is, there is none. It's just a fun silly thing that happens to be pretty.
And you know, that's ok. Why does there need to be a reason to create something other than the urge to do so?!
And nestled a piece of the Victorian Corners 2set onto the bodice (it fits just right!)
I've layered silk rose petals and tulle for the dress portion, simply hot gluing them in place. A bit of glitter, paper flowers and a heart embellishment and voila! you've got a sweet little something.
If you need some guidance to create this piece, I have a video walkthrough HERE, but rest assured it's easy as can be.
My toes are cold. I am wrapped in both a blanket and a very woolly, very warm, scarf. I am THIS CLOSE to dragging the little oil heater over to my desk and using it as a chair. I feel like I just might never ever get warm again!
I shouldn't complain. We've had such a mild, 'easy', winter.
Between this chill, and the plethora of seed catalogs Mr Pixie has strewn about the house, I can't help but long for spring.
**You could absolutely cut your own cardboard ATC blanks from a cereal box, but THESE chunky ATC blanks are some of my favourite things. They take an absolute beating without warping at all and are super thick and strong.
If you're in this hemisphere, I hope winter is being kind to you. Stay warm, lovelies!
P.S. While we're talking about warm thoughts... I'm escaping the cold next week and headed to a warmer climate (Helllloooo Cuba!) Only digital files will be available in the etsy shop from February 2nd to 11th and my internet will dodgy at best.
P.P.S. I have a "Snowday" sale wrapping up tomorrow. Here's your coupon codes if you'd like something from my etsy shop:
SNOWDAY10 10% off $15+
SNOWDAY15 15% off $30+
SNOWDAY20 20% off $60+
SNOWDAY25 25% off $100+
I love projects that are made just because. Just because I'm enthralled with something and want to explore and celebrate whatever is clunking around in my head and tickling my fancy.
Today I'm showing off one of those projects AND I have a tutorial so you can embrace your own weirdness.
I've been making miniature scrapbook albums of the crazy variety.
I've gone absolutely coo-coo for true crime podcasts over the past few months. I've become well versed in all things serial killer. I am overflowing with terrible information that is probably inappropriate table conversation (which in no way prevents me from talking about it endlessly at dinner.) This led to UFO's and Bigfoot and... and... and...
I really like these books. They lay flat, open easily, there's space to add pictures and snippets without too much bulk and they are fairly fuss free to make. They aren't made to a particular scale, and I'm fine with that. (If scale IS important to you, you could adjust the measurements.) They're big enough to be handled and I think they'll be fun for those who are interested in mini things, without getting too complicated.
While I love, love, love all this murder and mystery, I have not forgotten my sweet and squishy side.
I also made mini albums with tea stained pages and vintage mini goodness...
And a fairy believer's album too!
So how you make these precious little books? The video tutorial can be found at the bottom of this blog post (or jump directly to my channel HERE).
Here is some of the other information you'll need.
Supplies:
Cardboard (i.e. cereal box)
Card stock for the inside pages (heavy/cover paper/scrapbook paper)
Scrapbook paper for the cover
Glue stick
Scissors
Optional but recommended tools:
Roller/brayer (Honestly, it makes everything stick so much better.)
Paper cutter
Scoreboard
Measurements:
Card stock: Cut into 2.5" strips, score at .25" from edge, then cut into 1.75" pieces
Cover cardboard: 2.25" x 1.75"
Scrapbook paper: 3.5" x 3" (this gives a large fold)
How many pages you add is up to you. Decide on a number then add 2 to account for the pages that attach to the cover. I'd recommend starting out with 8 to 10 pages. It can be surprisingly difficult to fill those small pages!
The filling!
Looking for bits to fill these wee books? I've got you covered.
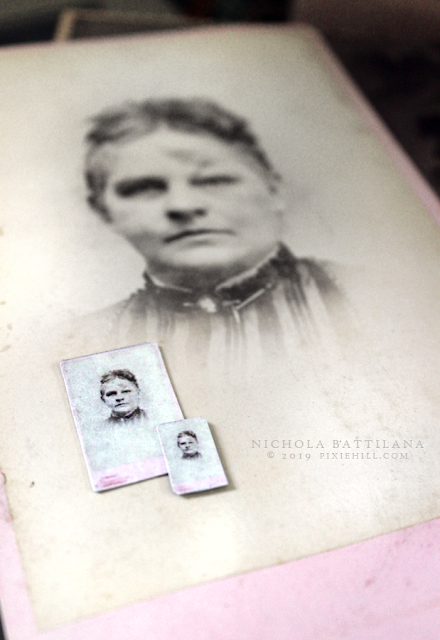
I have a really lovely collection of old cabinet cards and Carte-de-Visites. I've been meaning to scan them for years, but I the process seems so overwhelming.
I got it in my head to reproduce some of the photos in miniature. I photographed the front and back (some of the reverse sides have beautiful graphics!) to achieve totally accurate reproductions. Yes, they looked great... but what a pain in the bum! Recreating the backsides was quickly abandoned.
BUT!!! I did forge ahead and make a few batches of 1:6 and 1:12 scale of some of my photos.
Just like the life sized versions there is variation in their finished sizes. I think this makes them rather more special. Wonkiness usually does.
Aside: what is your favourite scale to work in? I think that making thing as teeny as possible is challenging and impressive but larger playscale is a bit more enjoyable.
Someone mentioned that they'd like to convert their own photos into miniatures. If you're just looking to make minis of your snapshots and have basic photoshop knowledge, I've got a bit of a solution for you.
Create a folder and add the photos that you'd like to miniaturize (I make copies so that I can just delete the whole folder when done.)
Open the folder and change the 'view' to 'large icons'
Adjust the window so that there are 5 or 6 columns of photos like so...
Now, either take a screen shot then crop the thumbnail area, or use your computers snipping tool to create an image file like so.
You could just print this screen-grab file but to be honest I think it looks a bit fuzzy and the thumbs are tad too big for my liking. Instead, I create a new document in Photoshop (or other photo editing software) at 8.5" x 11" 200dpi, then copy and paste the image into the new document. Then print that sucker out!
This makes the thumbnails just the right size to use with THIS mini scrapbook.
Cut out those thumbs and pop them inside!
If all of that is a little too complicated for you, and you'd like some wee vintage photos, I have 1:6 playscale photos available HERE and smaller 1:12 dollhouse scale listed HERE.
Ok. So. I tried to make something pretty. AlphaStamps sent me some gorgeous papers to use with their tent card framesbut it was not happening. I'm going to blame my recent podcast listenings for what happened.
I went about as far from pretty as one can get and found myself in a deep dark conspiracy hole.
Not a pink floral paper in sight! Instead I've taken a trip into the basement of the J Edgar Hoover building and gone rummaging through the X-Files. (I'd totally wink at Foxy Mulder circa 1993.)
Flip those folders open (You HAVE to peek when something is marked "top secret" and "confidential") and you'll find top secret office memos and case files. What could possibly be so ultra important?!?!
Photographic evidence of aliens and Bigfoot of course!
They're grungy. They're messy. They ain't pretty... but I kinda love them!
There's a teeny tiny supply list to create these and I've put together a super cool collage sheet for you to make your own top secret files.