Wednesday, January 03, 2018

Two Chippy Shadow Boxes

If the entire of 2018 goes past as quickly as the last three days, it'll pass in a blink. What a blur!!! First, HAPPY NEW YEAR TO YOU! It's going to be a great year. I can just feel it. Can you feel it? It'll be grand.

Now, on to today's project, which is actually two projects using the same chipboard 4x6 Shadowbox as the base.


The first box is a garden fairy theme... because that's what my supplies demand I create. I've used the Shadowbox Lid - Double Pane Window for this piece. You can just peek beyond the pane to see the winged fairy and butterflies inside.

I really prefer these two piece lidded boxes btw. They are soooo much easier to work with than a hinged top boxes.

Chippy Shadowbox - Nichola Battilana for Alphastamps.com

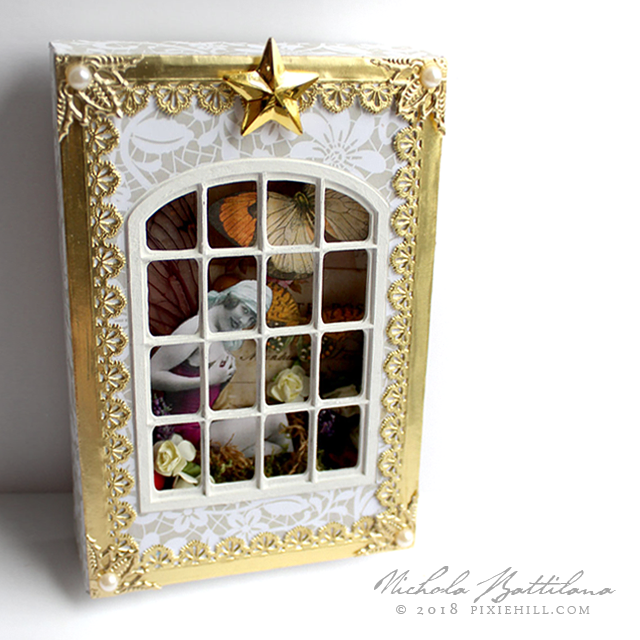
I've added a bed of Sheet Moss and loads of Tiny Paper Roses to the interior.
Chippy Shadowbox - Nichola Battilana for Alphastamps.com

I think this would actually make for a nice alternative for a birthday card. You could tuck a little message inside, a salutation for magical birthday wishes.

Chippy Shadowbox - Nichola Battilana for Alphastamps.com

Although different thematically, the exterior of both boxes is bordered with Gold Dresden. Let's face it... that stuff is just magic. I'm not one for resolutions but I think I need more lushness and opulence in my life and I'm sure upping my gold dresden usage would make my world prettier.
Chippy Shadowbox - Nichola Battilana for Alphastamps.com

Speaking of lushness and more. I've replaced this angels wings with something a little more substantial from the Angel Wings Collage Sheet. I'll admit it, sometimes size does matter. 

Chippy Shadowbox - Nichola Battilana for Alphastamps.com

A bit of cotton batting tucked into the bottom of the box, a glittery night sky, and you have a dreamy romantic shadowbox.

Chippy Shadowbox - Nichola Battilana for Alphastamps.com

Want to make your own dreamy shadowboxes? I bet you'll come up with something spectacularly magical! Here are the supplies that I used for my boxes ... and an itemized list too:

4x6 Shadowbox
Shadowbox Lid - Double Pane Window
Shadowbox Lid - Taj Mahal
Sheet Moss*
Floral Lace on Taupe Scrapbook Paper
Mixed Size Ivory Flat-Back Pearls
Angel Wings Collage Sheet
Romantique Parisian Scrapbook Paper
Fancy Gold Dresden Rosettes
Gold Star Garland
Brass Starburst Charm
Fancy Scalloped Gold Dresden Borders
Gold Dresden Halos
Thin Fleur Dresden Borders - Antique Gold
Angel Wings Collage Sheet
Bouguereau #4 (Angels) Collage Sheet
Double Dot Vintage Dark Denim Blue Scrapbook Paper
Fairy Wings Collage Sheet
Tiny Paper Roses
Bathing Beauties #1 (Tallulahs) Collage Sheet

Friday, December 29, 2017

Bobby Pin Paper Crowns

I know. I KNOW! I know I said my next post would be the how to for the fairy godmother goodies. The holiday monster has had a vice like grip on me and there have been casualties. I pinky swear and cross my heart, those how tos are on the way

BUT NOW... paper crowns.


If you've followed along with my craft madness for any length of time you will know that I have a thing for crowns... paper crowns... paper crowns with glint and glitter.


So I was chuffed that Alpha Stamps chose Winter Crowns as their December kit theme!


So much gorgeousness. And all that gold dresden! *SWOON*


I didn't make my crowns in the round. I just used the kit template as it was. I figured this would be practical for two reasons: 1) shipping. MUCH easier to ship a flat crown than a round crown. 2) I have friends who claim to have massively large and unusually small heads. I figured leaving the edges free, those friends who have hair could simply keep them in place with bobby pins.


Two pins slipped over those loose ends and through the hair and those crowns stay in place pretty well!


And no need to worry about fitting.


If you have no hair I might suggest a little tape? Some glue? 

(Kidding! Do not glue things to your head.)


I had planned on wearing these for Christmas dinner but the tissue crowns from our Christmas crackers won out. SO... I'm totally rocking one of these on New Years eve instead. I'm totally fancy like that!


Want to make your own? Here's the supply list (you might want to take a gander at this list even if you aren't making crowns because the gold dresden pieces are glorious!)

Winter Crowns December Kit
Golden Night Wired Leaves
Stitched Leaf Ribbon - Gold
Mixed Size Ivory Flat-Back Pearls
2 Inch Gold Star Ornament**
Gold Star Garland
Fancy Scalloped Gold Dresden Borders
Gold Dresden Halos
Large Zig Zag Gold Dresden Edging
4 Inch Round Gold Doilies
Fancy Gold Dresden Rosettes
Portraiture Collage Sheet
Pear-Shaped Pearl Stick Pins - Gold
Floral Lace on Taupe Scrapbook Paper
Courtship Lane East Plaza Scrapbook Paper
Under the Stars Scrapbook Paper
Mini French Labels Collage Sheet
Winter Snow Glitter Mix

Night Angel Mixed Media Triptych

This month for GSLCuts.com I've created a set of three mixed media angels. A dreamy mystical triptych.


With New Year looming I thought it was a perfect time to think of dreaming and making wishes. That's what this set is all about. Looking up and forward and making bedtime wishes listened to by Night Angels.


Each of the three elements is made using a Cross Top Triptych piece. One of the thing I really appreciate about these elements is that the front piece is made up of straight edges, making it easy to embellish with scrapbook paper.


Each of the three seperate pieces is a slightly different size, but all fit nicely on Gypsy Soul ATC Stands. This makes displaying your pieces soooo simple. AND those little stands come in a set of three  so they're perfectly matched. (AND they're pretty dang reasonable too!)


While putting these pieces together is so simple, I have a little walkthrough of the process of making them. Hop over HERE for the video.


Below are all the bits I used to create my pieces, but you should absolutely feel free to add your own special touch to create your own dreamy night angels.


Cross Top Triptych
ATC Stands

decorative scrapbook papers
acrylic paint

Saturday, December 16, 2017

Fairy Godmother's Wardrobe - Part One

(Heads up: this will be a post in two parts. Showing off today, and a follow up how-to for some of the wee bits inside.)

I've been sitting on this project for a couple of weeks. I received an Unfinished Wooden Wardrobe and had a few ideas. I thought of a magical portal, storage for a saucy burlesque star, something pink and filly and Marie Antoinette. Why not all rolled up into one?! A fairy godmother wardrobe!

Fairy Godmother Wardrobe - Nichola Battilana

As you may know, I am a big fan of fairy godmothers. They must, absolutely MUST, lead the most interesting lives. I am sure they are usually helpful, a little scatterbrained, enjoy a good drink and have amazing adventure stories from their younger days.

Fairy Godmother Wardrobe - Nichola Battilana

I gussied up the exterior of the wardrobe with pink paint and glitter and Courtship Lane East Plaza Scrapbook Paper. Then I set to filling it with magic and a few secrets.

Fairy Godmother Wardrobe - Nichola Battilana

There are books about magic and kissing frogs and toads, a tea pot and postcard memories. Godmotherly magazines. Pumpkins appear throughout (I've given them a wash of orange to add more colour.) 

Fairy Godmother Wardrobe - Nichola Battilana

There's bottles of pixie dust and magic, posters and seed packets.

Fairy Godmother Wardrobe - Nichola Battilana

Cherished photos stuck to the mirror and post-it notes to remember to reserve a spot at the ball!

All of the paper items, the book covers, magazines, postcards, photos, labels, posters are from my new collage sheet "Fairy Godmothers Cupboard"

Fairy Godmother Wardrobe - Nichola Battilana

The sheet also includes a set of love letters and envelopes and a template to create panties, stockings and a corset... because of course, OF COURSE, fairy godmothers would have romantic memories and adventures!

Fairy Godmother Wardrobe - Nichola Battilana

My next blog post will show you how to put all those piece to good use and create those little bits. 

Fairy Godmother Wardrobe - Nichola Battilana

Seriously, everyone needs to have tiny panties!

Fairy Godmother Wardrobe - Nichola Battilana

So, get your thinking caps on! Think all the thoughts! Gather up a history of adventure and love to create your own fairy godmother cupboard.

Here are all the bits I used if you see some ideas you fancy from my wardrobe...

Unfinished Wooden Wardrobe

Friday, December 15, 2017

A Glorious Moon and Morning

I am not a morning person. At all. I need at least 3 mugs of coffee before I am civil. Ask me to pick between sunsets and rises and I will pick sets every time. But this morning the sky was pink and reflecting off the pristine snow and streaming through  the white birch branches and I took notice.


A friend commented that Mother Nature "did phone up and say she was happy you took notice. FINALLY!" and I'm sure this is true. I feel like I've been missing so many of the beautiful things around me. 2017 has kicked my ass so badly that I've been bandaged head to toe and blinded to the things that make me happiest. I'll be glad when this year is gone. GOOD BLOODY RIDDANCE TO YOU 2017! *shakes fist angrily*

BUT let's stay focused on nice things like happy moons and little houses.


A new moon shrine. This fellow measures 7" wide 10" tall and 1.25" deep. It's a tiny bit different than some of the other shrines I've made.


The clay used for the moon is different than the one I normally use. Those stars are something a little different too. Different isn't better or worse... it's just different.

Generally speaking, the only time different is bad is when someone uses it to describe your work. "Oh, that's different." This is the song of the choir that doesn't have praise for your art but doesn't want to offend you.


Those mushrooms are different too. I normally stick to paperclay, it's my preferred material, but these are polymer. Again... no better or worse, just different.


This piece is available in the etsy shop HERE

P.S. If you happen to be nearby, my doors will be open tomorrow, Saturday December 16th from 10am till 4pm. And I'll be around Sunday from 1pm until 3pm for stragglers. Stop in and say "Hello weirdo, you're work is... different."

Wednesday, December 13, 2017

Fairy Butterfly Shrine

There are a whole whack of tiny shrines sitting on my work table waiting for something to jump inside of them. This particular shrine is much bigger than those tiny ones.


Inside is lined with vintage dictionary pages and a paper fairy sits inside.


The roof is covered with birch bark from a felled tree from our property. And that lovely round wooden piece at the peak is a piece from a vintage french lottery game.


Overall shrine measures approximately 7.5" wide, 9.5" tall, 2" deep.

The Fairy Butterfly Shrine is available HERE


Tuesday, December 12, 2017

Twinkly sky and mushroom garden shrine


Are you ready for Christmas? I am not. Not even close. But I've been keeping at the making.


Base is a wooden box and pedestal. Glittery night sky over vintage music papers. Wee house was pit fired in the back garden at Pixie Hill. Tiny toadstools are handmade from paperclay.


This wee thing measures approximately 3.5" wide, 6" tall, 2.5" deep.

The Tiny Night House Shrine is available HERE