Saturday, December 10, 2016

Day 10 - Vintage Image Shaker Ornaments

This month the Alpha Stamps is offering Round Layered Ornaments Kits. They are pretty dang cute. I've actually done two* versions of these (you'll see the second batch next week). 

*Maybe even three if I get my act together.

But on to the ones that I've actually finished and am ready to show off today!


Pretty cute, no?! If you had told me a few years ago I'd be all about the glittery pipe cleaners (and yes, they will forever be pipe cleaners to me) I would have told you, you were nuts... but here we are all glittery and pipecleanerish!


Not only do these sweeties shake and make a lovely noise, are two sided to boot!


I'm smitten!

And here's all the goodies to make your own...

Round Chipboard Ornament Layers Sets
Snowy Winter Day Ornaments Collage Sheet
Silver Snowflake Charm Set
Winter Snow Glitter Mix
Round Ornaments Ribbon Set

Friday, December 09, 2016

Day 9 - A Winter Cottage

Look at the glistening snow! Aww, it's all melted now, but I've got all my fingers and toes crossed that it will return soon and that we'll have a proper white Christmas this year.


This itty bitty was made (mostly) with the  Chipboard House Ornament Kit from last month.


The house itself measures just 2-3/4" tall, 2-1/2". It's itty!


My favourite part of this little doodad is the tuft of raw wool smoke coming out of the chimney. Can't you just smell the wood fire?!


Hope you're dandy. Big love to you.

Thursday, December 08, 2016

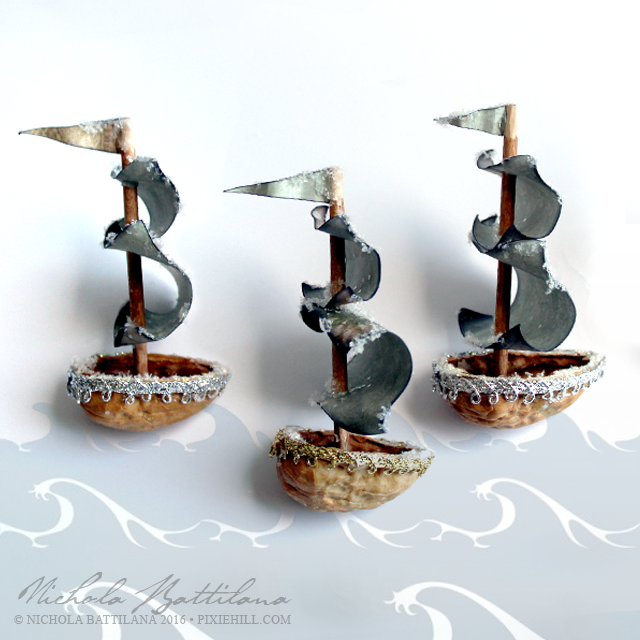
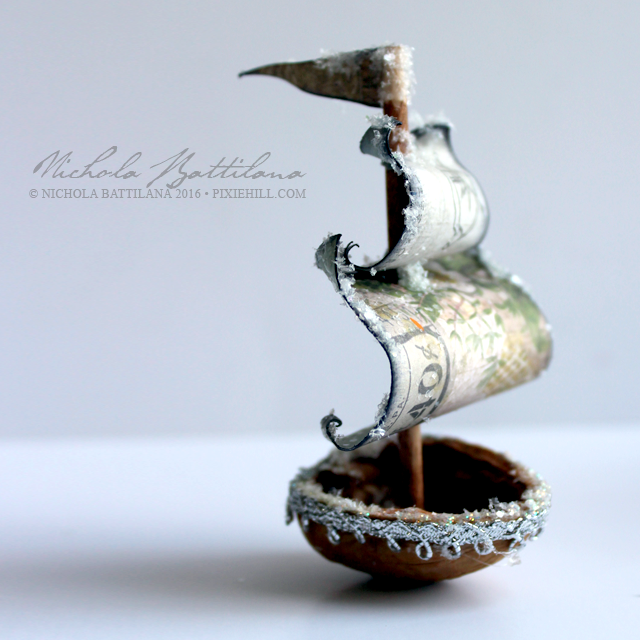
Day 8 - Walnut Sailing Ships

Despite not being a water-loving sea monster, I do have a thing for pirate ships and nautical adventure. AHOY! And all that jazz.

Walnut Sailing Ship - Nichola Battilana

I'm pleased as punch with these little walnut ships. They're kind of adorable and remind me of THIS Christmas song.

Walnut Sailing Ship - Nichola Battilana

They were super simple to make too. Just a walnut shell, 1/8" dowel, paper and trim. Easy peasy!

Walnut Sailing Ship - Nichola Battilana

There's a little snowy glitter too. I can't help myself.

Walnut Sailing Ship - Nichola Battilana

Hope your having a lovely day. I'm thinking of you.

xoxo

Wednesday, December 07, 2016

Day 7 - SPARKLE BATH!

As far as I am concerned, there are two types of people in this world: those who loathe glitter and those who want to bathe in it.


I've made some sparkly, glittery, shiny, smelly, rose-budded bubble bath for the latter.

If you see someone with red sparkle, you'll know they were on my Christmas list.


P.S. These remind me of the year I had $36 to spend on all of my Christmas gifts. If memory serves, most of that was spent on toiletries that were rationed and prettily re-packaged. It stinks not having money, but it is painful not having money during the holidays. If your holiday funds are tight, I'm sorry. I know exactly what that's like. You'll get through. Everything will be ok. I promise.

Tuesday, December 06, 2016

Day 6 - A Wee Pinecone Tree

Mr. Pixie often says, "I'm the idea guy."

This usually means that he has a fantastical but outrageous idea that is an impossibility to bring to fruition. Once in a while his ideas are totally do-able. "You should make a little pinecone Christmas tree." Done!


A pinecone...


Some glitter...


And a tiny tin bucket.

Ta da!

Monday, December 05, 2016

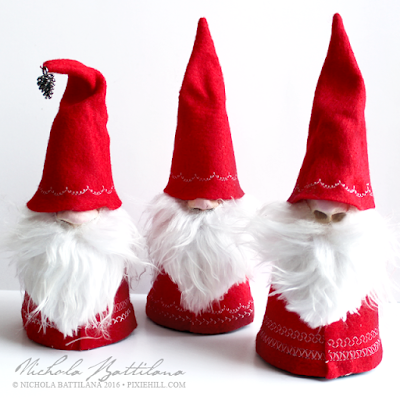
Day 5 - Tomte Christmas Gnomes

I made a batch of these fellows last year and I loved them so much I wanted to make them once again. This year they are quite a bit smaller (but just as cute).


Tomte are Scandinavian creatures associated with yuletide. They are delightfully gnomish and since I collect gnomes I love them dearly.


They are cute as buttons and making them is a lot of fun. Their personalities just seem to pop out as soon as those white whiskers are put into place.


Tomte, elves and sugar plum fairies... is it any wonder I adore Christmastime?!


Sunday, December 04, 2016

Day 4 - Little Snow Dudes with Tutorial

I'm not sure why I keep calling these guys 'Snow dudes' rather than 'Snowmen' but they keep insisting that IS what they are called, so I shall comply.


I made a slightly larger and more complicated version of these guys last year. This year, I've simplified the heck out of them while maintaining maximum cute.


And if you'd like to make your own HERE is the video tutorial...


And here's what you'll need:

styrofoam balls
jute twine
white/clear glitter
good quality white glue
hot glue
small metal brads
black seed beads
straight pins or flat head jewelry posts
toothpics
black and orange paint
small eye hooks

Saturday, December 03, 2016

Day 3 - Tiny snowy house

Just something small and sweet today.

I think this will be a perfect thing to abandon with a note of holiday cheer.

The dome has been in my stash for quite a long while. THIS little tree was coloured green and dusted with some faux snow. The house is one which was pit fired in my back garden. And the gold is a snip from one of these dresden trims.


On top, a little bow with ribbon from THIS set, with a tiny snip of green and some colour from this Fancy Red Holly Berries Mix.

Ta dahhh! How's YOUR holiday cheer chugging along?


Friday, December 02, 2016

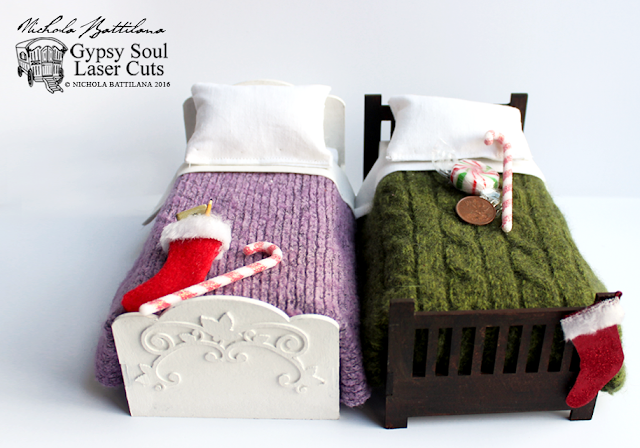
Day 2 - Cozy Fairy Beds

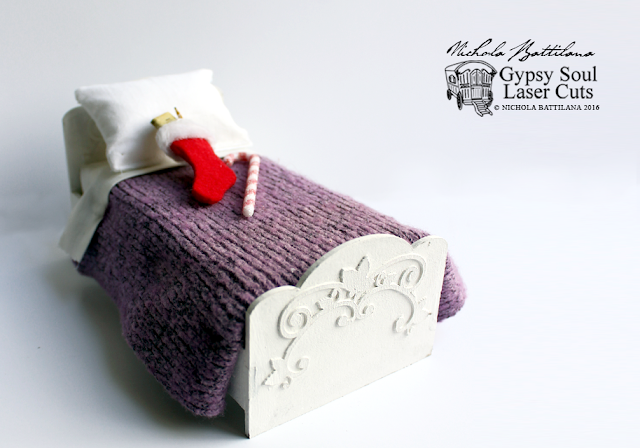
When I was a little girl, my Christmas stocking was always placed at the bottom of my bed. I'd wake up super duper early on Christmas morning and find a sock full of treats waiting for me. I'm sure this pleased my mother, as it gave her some extra sleep while I pillaged the stocking goodies.

Cozy fairy beds - Nichola Battilana

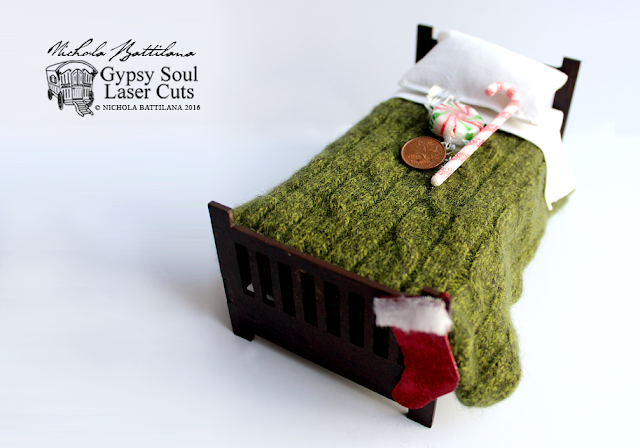
I am CERTAIN that fairies celebrate Christmas too. (In fact, fairies love celebrating so much, I'm sure that they partake in every possible holiday!) I wanted to give my fairies the same Christmas experience so, I've made my house fairies some little beds to get tucked into on Christmas eve. I've used a Gypsy Soul Mission Style Bed and a Standard Bed. I've added Leafy Corners to the Standard Bed as decorative accents. 

Cozy fairy beds - Nichola Battilana

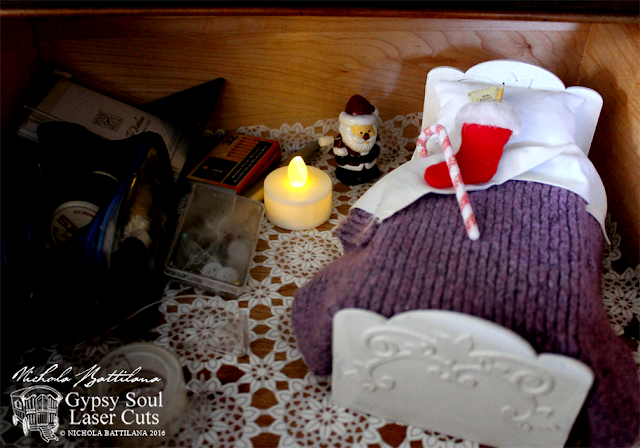
The linens have been made from an old cotton pillowcase and the bedding is chopped from discarded sweaters. They are quite the cozy little things!

Cozy fairy beds - Nichola Battilana

I've also used the Christmas Shape Set to add a stocking to the end of the bed. I've dusted one with glitter and added a fuzzy trim... but if you want to get extra fancy, use the cutout as a template and cut 2 shapes out of felt. Glue the edge together and you'll have made a cute little stocking you can put the tiniest of treats inside!

Cozy fairy beds - Nichola Battilana

Now my fairies will be tucked safely into drawers and cupboards, no-so-patiently waiting for Santa's arrival. If you want to create your own wee beds, HERE is a video showing just how I put these cuties together.

Happy holidays to you and your fairy folk

Supplies
Acrylic paint
Glue
Styrofoam
Cotton fabric
Old sweater
Felt & fuzz (if making stocking)


Thursday, December 01, 2016

Day 1 - Zombie Ornaments

I had this ridiculous idea that I'd try to post a project a day, a sort of bloggy advent calendar for the month of December. I've got a good stockpile of projects here, so hopefully I can coax 24 blog posts for the month. Who knows if it'll happen but we'll give it a try, eh? ;) 

Some of the projects will be gifts. Some will be abandoned for strangers to spread some holiday cheer. And very few will be for sale if you want to gimme your pennies.

Let's get to business.... Zombie Ornaments!!!!!!

Zombie Ornaments - Nichola Battilana

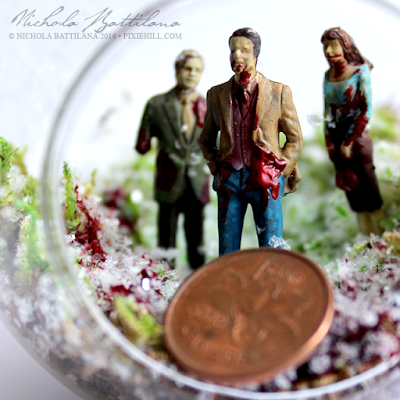
I did some miniature zombies not tooooo long ago, and so when someone mentioned their 'creepmas tree' these things had to happen.

Zombie Ornaments - Nichola Battilana

I mean, just because it's winter doesn't mean that there are no zombies right?

Zombie Ornaments - Nichola Battilana

I bet that there are even Christmas Day zombies!

Zombie Ornaments - Nichola Battilana

I made a VERY small batch of these. There are only 8 for sale and I won't be making more.

Zombie Ornaments - Nichola Battilana

If you require some Christmas Zombie magic HERE is the listing.


P.S. Love you loads and bunches! Hope you're having the BEST day.

Friday, November 25, 2016

A Floo Network Fireplace

I interpret "Do you want to play with a fireplace?" as "OMG, MAKE A FLOO NETWORK THING!"

That's exactly what happened.

Floo Network Fireplace - Nichola Battilana

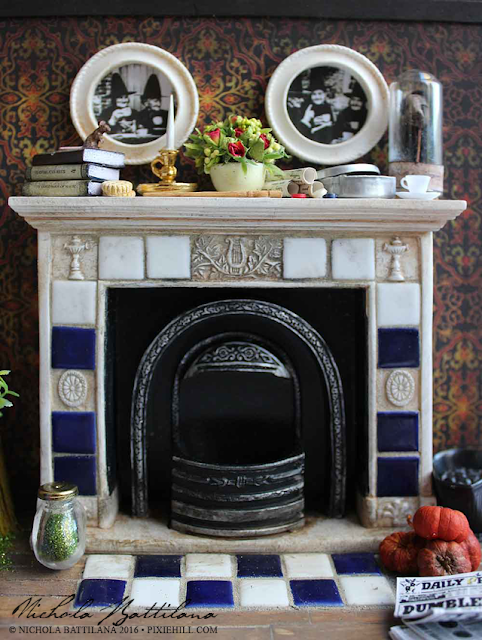
I've made a number of pieces inspired by the Weasley's (my favourite magical family) lately, so I wanted to do something a bit different with this piece. It occurred to me that it might be fun to create a something as if I lived in that magical world! And so, here is what I imagine my floo network fireplace might look like...

Floo Network Fireplace - Nichola Battilana

I'd have framed pictures of my magical relatives above the mantle. Stacks of books with magical titles, a Round Tin of tiny buttons, Cookies and a big bunch of Rose Buds too.

Of course I would read the Daily Profit regularly, and there's a stack on the floor. (Hint: A google search will provide you with several printables.)

Floo Network Fireplace - Nichola Battilana

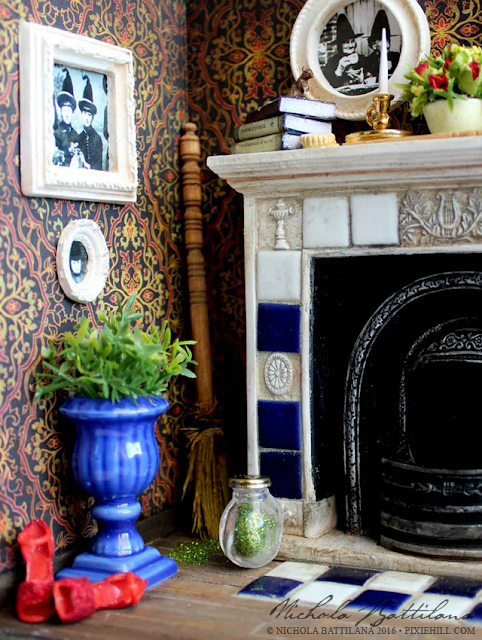
You can't have a Floo Network fireplace without Floo Powder. There's some of that sparkly green stuff ready to go in a Tiny Glass Jar. And, because I'd be a mess even in the magical world, some powder has spilled and swept into the corner.

Floo Network Fireplace - Nichola Battilana

There's a lot going on this piece, but it's not ENTIRELY jumbled. It really does remind me of home with it's just-the-right-amount-of-clutter but not hoarder-level mess.

Floo Network Fireplace - Nichola Battilana

Even though it's not in complete disarray, there are loads of details to be found. Little stories within the scene, like this mouse keeping watch over the biscuits. That tea cup on the mantle and haphazardly placed pair of sparking red shoes clearly show what a busy witch I would be. (BTW I would wear those shoes every single day.)


I am quite smitten with this piece and think I'll keep it in view to remind me to strive for magical living in this world, and as evidence that a little mess is just fine and dandy.

Want to make your own? HERE is everything listed in one place and below is a list of the supplies I used:

White Undecorated Fireplace
Dark Blue Porcelain Tiles
White Porcelain Tiles
Blue Ceramic Urn
Corner Room Box
Coal Scuttle Set
Set of Miniature Books
Tiny Glass Candy Jar
Tiny Grey Mouse
Mini Silicone Mold - Cookie or Biscuit with Filling*
Mini Rose Buds - Red*
Mixing Bowl Set
Chamberstick Candle with Glasses
Doll Buttons - 6mm Mix
Domed Apothecary Bottles*
Miniature Round Cookie Tins
Simple Cups & Saucers Set - Set of 12
3-3/4 Inch Wooden Posts
Pumpkin Pods
Blue Damask Wallpaper Scrapbook Paper (outside of piece)
Wonderfully Wicked Haunted Scrapbook Paper
Little Library Collage Sheet
Something Witchy Collage Sheet
A Witchy Encore Collage Sheet
Glitter
Handmade shrunken head
Tiny sparkly shoes!
Paint
Glue
A crap-ton of love


Thursday, November 24, 2016

A Little Christmas Shrine

It really and truly is beginning to feel a lot like Christmas. There's a month of making and baking ahead, but this little elf is getting her holly jolly on. (We did get snow btw and that helps the holiday spirit A LOT.)

I'v been making loads of little things and this little Christmas shrine popped up on my work table this week.

I've used this House Shrine with Doors for the base. If you know me at all, you know how I feel about doors (or rather how I struggle with hinges) so those suckers are glued wide open. Why would you want to close it up anyway? You want to be able to see all the cute inside!


I've embellished with papers from this month's House Ornament Kit, Gold Ric Rac Dresden Borders Set, Glass Christmas Seed Bead Garland and Flat-Back Gold Star Studs. For the little legs I've trimmed down this Set of Wooden Table Legs.
All the wee things tucked inside can be found HERE. And, while all of my little boxes are just decorated cubes... wouldn't this be the most darling way to present a small gift?! A tiny bauble perhaps, with a love note tucked into that little drawer would be perfection!

Here's the full list of supplies from Alpha Stamps:
House Shrine with Doors
Christmas Delivery 6x6 Paper Pad
Tiny Christmas Windows Collage Sheet
Gold Ric Rac Dresden Borders Set
Glass Christmas Seed Bead Garland
Flat-Back Gold Star Studs
Set of Wooden Table Legs
Fancy Gold Holly Berries Mix*
Fancy Red Holly Berries Mix*
Santa Sleigh Silver Charm Set**
Tim Holtz Adornments Pinecones
Wired Pine Needle Stems*
Woodland Tree Lot - 5 Tiny Trees


P.S. I hope my American friends have had a great Thanksgiving! I am grateful for you.

Friday, November 18, 2016

Altoid Advent Calendar

Are you ready to be bombarded with pictures? This is a biggun'. Well, the actual thing is quite small... but it's almost epic in it's awesomeness!

I've thought about creating an advent calendar in an Altoid tin for a very long while, and finally set my mind to it. I'm really, really proud of how it turned out and I'm so excited to share it with you.

Altoid Advent Calendar - Nichola Battilana

The outside is sweet and jolly lovely. A wee wreath made with a snip of Wired Pine Needle Stem with the teeniest bow and Star Sequins. The corners are frosty with layers of glitter and faux snow. That little gnome can be found on this Santa is Outside Collage Sheet.

But the inside... oh the inside!

Altoid Advent Calendar - Nichola Battilana
*Gasps! Claps hands! Jumps up and down* LOOKY AT THAT! Can you even stand it?!

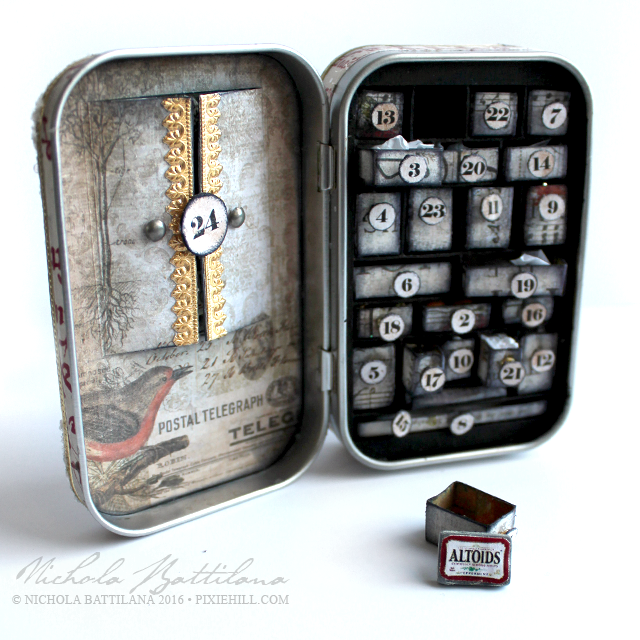
Get a load of all those little drawers. Each one with a little surprise tucked inside.

Altoid Advent Calendar - Nichola Battilana

I'm going to be honest. This was an enormous pain in the bum to make. It took a gazillion times longer than I had anticipated. I'm a disaster for measuring and straight lines, so those little boxes were a nightmare. And, because it's sooooo tiny, any wobble or imperfection throws everything off (and believe me, there are imperfections a-plenty here.)

Altoid Advent Calendar - Nichola Battilana

But let's not focus on the rump pain. Let's look inside... 

Altoid Advent Calendar - Nichola Battilana

Once the drawers were created, the next issue became what the heck would fit inside them. Some of the drawers contain dollhouse miniatures like the tiny tankard above. 

Altoid Advent Calendar (detail) - Nichola Battilana

One of the drawers contains a small collection of lucky charms. (Three is when something becomes a collection, right?) If you decide to tackle a similar project, charms and beads are a great option for filling those small spaces.


Another drawer is filled with shiny stars.

Altoid Advent Calendar - Nichola Battilana

There's an itty book of sketches.

Altoid Advent Calendar - Nichola Battilana

And a chocolate kiss made with a chocolate chip and snip of foil! 

(Confession: in reality I'm distraught because it's a butterscotch chip inside. The horror! The fairies must have eaten all the good and proper chocolate ones.)

Altoid Advent Calendar (detail) - Nichola Battilana

Of course I couldn't not include glitter. This glass vial was from a vintage set that contained the tiniest watchmaker gears you can imagine. Even though it was already so very small, I still had to cut and file it down to fit it in the drawer!

Considering the recipient is helpful for ideas too. This piece is on it's way to a fellow who once made a giant circus peanut, so I've included handmade fairy sized versions.

Altoid Advent Calendar - Nichola Battilana

I also included a teeny weeny Altoids tin...

Altoid Advent Calendar - Nichola Battilana

Perfect, no?!

Finally, on the last day of the count down, the little doors are popped open to reveal a message of seasonal glad tidings.

Altoid Advent Calendar - Nichola Battilana

What do you think? Do you love it?! I love it! I'm so damn pleased with myself it's obscene. Ha!

Thinking of making your own? I don't have a tute, but here are some pointers:

• Give yourself a lot of time.  A LOT. I mean it. This thing was nuts to make.
• Be as organised as you can be with your materials.
• Keep your working area clean (ha! I know.)
• If possible, gather more items than you need for the drawers. Having many options is really helpful.
• A small snip of tissue tucked into the drawers helps to keep small loose items in their place.
• Creating drawers of differing sizes not only adds visual interest, but allows you to include items of various sizes.
• Tweezers. Get some. Use them. Love them.

Other supplies used in this piece:
Narrow Gold Fleur Dresden Borders*
Tiny Dot Dresden Borders - Gold*
Wallflower 12x12 Paper Stash
Flat Brass Drawer Pulls - Set of 16
Old Fashioned Grocery Rectangular Tins

Be sure to let me know if you create your own version of this project and show off your mad skillzzzz. Start now and you may be done by next Christmas ;)

I love you THIS much!